If you are maintaining a legacy SONET or SDH transport network, the OC-48 fiber module often becomes the difference between scheduled downtime and a stable, multi-year run. This article helps network engineers and field techs choose the right optics for distance, connector type, and switch compatibility, then troubleshoot the most common link failures. You will also see practical deployment details from real leaf-spine and metro ring environments, where power budgets and optical margins matter.
What an OC-48 fiber module actually carries in SONET/SDH
In classic SONET/SDH transport, OC-48 corresponds to a line rate of 2.48832 Gbps. Practically, the module is the optical interface that converts electrical line signals to fiber light and back, enabling a pair to run point-to-point or as part of a protected ring. Engineers typically align optics selection with the relevant physical layer framing and optical reach class, while the switch or mux handles the higher-level SONET/SDH payload processing.
From a standards perspective, physical layer behavior is governed by the vendor’s transceiver compliance and the underlying Ethernet-like optical interface conventions, but SONET/SDH line coding and alarm behavior follow transport system expectations. For authoritative background on SONET/SDH framing and alarm semantics, see [Source: ETSI] and [Source: Telcordia]. For optical module electrical/optical characteristics, consult IEEE references where applicable and vendor datasheets for exact specifications. ETSI Standards
Pro Tip: In many legacy deployments, “it should be compatible” fails because of optical power class and receiver sensitivity, not because the wavelength is wrong. Before swapping, record the current module’s TX power and RX margin at the far end, then match the replacement’s optical budget within the system’s defined margin.

Core optical specs to verify before you buy
When selecting an OC-48 fiber module, the most important parameters are wavelength, fiber type, connector interface, optical power levels, and operating temperature. Even if the module “looks right,” mismatches can prevent link establishment or cause intermittent errored seconds under marginal conditions. Field teams often validate these parameters against the transport chassis optics list and the system’s optical budget.
Minimum spec checklist that prevents rework
- Data rate: OC-48 line rate (commonly 2.48832 Gbps).
- Wavelength: typically 1310 nm for short to moderate reach, or 1550 nm for longer reach variants depending on the vendor and reach class.
- Fiber type: single-mode (SMF) vs multimode (MMF). SONET/SDH optical reach in legacy gear often assumes SMF for longer spans.
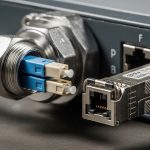
- Connector: LC duplex is common; verify the chassis cage and patch panel standard.
- Optical power: TX launch power range and receiver sensitivity.
- Temperature range: industrial vs commercial; legacy sites may be in hot equipment rooms.
- DOM support: Digital Optical Monitoring availability (varies by vendor and generation).
Typical OC-48 module specification comparison
Because vendors structure datasheets differently, use this table as a spec-hygiene guide. Always confirm exact values in the datasheet for the exact part number you plan to install.
| Spec | Common Variant A (1310 nm, SMF) | Common Variant B (1550 nm, SMF) | Legacy Compatibility Notes |
|---|---|---|---|
| Target line rate | 2.48832 Gbps | 2.48832 Gbps | Match the transport chassis optics list for OC-48 |
| Wavelength | 1310 nm | 1550 nm | Wavelength mismatch prevents link or causes heavy BER |
| Typical reach class | Short to moderate (site-dependent) | Longer reach (site-dependent) | Verify optical budget: connector loss, splice loss, fiber attenuation |
| Connector | LC duplex (common) | LC duplex (common) | Confirm patch panel and bulkhead standard |
| Operating temperature | Often -5 to 70 C class | Often -5 to 70 C class | Choose industrial if the room exceeds spec |
| DOM | May be supported | May be supported | DOM mismatch can break monitoring dashboards |

Real-world deployment: replacing OC-48 optics in a metro ring
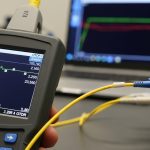
Consider a metro transport ring connecting two sites with 12 spans of single-mode fiber, each span averaging 8 km, plus 10 splices per span and standard LC connectors at each cross-connect. The total fiber length is 96 km, and the team estimates splice loss and connector loss to ensure the receive side stays within margin under worst-case temperature. During a scheduled maintenance window, a failed OC-48 fiber module is replaced in a protected shelf, but the team first confirms the wavelength matches the existing configuration and that the replacement’s TX power and RX sensitivity stay within the original optical budget.
On-site, field engineers typically verify link state, alarm LEDs, and any transport layer events (such as remote defect indications) immediately after insertion. They also compare DOM readings—if present—like bias current, laser temperature, and optical power to detect a “link up but marginal” condition that could produce errored seconds later.

Selection criteria: a decision checklist engineers actually use
Below is the ordered list that reduces surprises when deploying an OC-48 fiber module into a legacy chassis. If you do only one thing, run this checklist against the exact part number and chassis model.
- Distance vs reach class: compute optical budget using fiber attenuation at the target wavelength plus connector and splice loss.
- Wavelength and fiber type: confirm 1310 nm vs 1550 nm and SMF vs MMF assumptions used by the existing design.
- Switch or transport chassis compatibility: consult the vendor compatibility list; legacy transport shelves may be picky about electrical interface behavior.
- Connector and optics form factor: confirm LC duplex, cage fit, and any required blanking or latch orientation.
- DOM support: if your NOC relies on DOM telemetry, verify the replacement provides matching monitoring registers.
- Operating temperature: select the correct temperature grade for the room and rack airflow profile.
- Vendor lock-in risk: evaluate OEM vs third-party options, then validate in a lab or with a short pilot span before scaling.
Common mistakes and troubleshooting steps
Legacy SONET/SDH optics problems are often deterministic once you isolate where the mismatch occurs. Here are frequent failure modes for an OC-48 fiber module, with root cause and practical fixes.
Link never comes up after insertion
Root cause: wavelength or fiber type mismatch (for example, using a 1550 nm module on a 1310 nm design, or mixing SMF and MMF assumptions). Some chassis may not throw a clear alarm until you check received optical power.
Solution: verify the module label wavelength, confirm patch panel fiber type, then measure optical power at both ends if you have an optical power meter or OTDR access.
Link flaps under load, but stays up briefly
Root cause: optical budget is marginal due to higher-than-expected loss from dirty connectors, excessive patching, or aging fiber. DOM may show laser temperature or bias drifting, pointing to a stressed optical path.
Solution: clean LC connectors using appropriate fiber cleaning tools, replace any suspect patch cords, and re-check TX/RX optical levels against the system margin.
Erroneous transport alarms and errored seconds
Root cause: receiver sensitivity mismatch or excessive dispersion/attenuation at the chosen wavelength and reach. In some cases, a third-party module meets the nominal rate but not the exact electrical/optical tolerance expected by the chassis.
Solution: confirm the replacement part number’s datasheet optical characteristics, then run a maintenance test window while logging transport counters. If errors persist, try a known OEM module or a validated third-party model.
Cost and ROI: OEM vs third-party OC-48 optics
Pricing varies widely by availability, but in many markets an OC-48 fiber module replacement can range from roughly $150 to $600 for widely supported third-party units, while OEM pricing is often higher and can exceed $800 depending on lead time and part scarcity. TCO should include downtime risk: a quicker validated swap can prevent multiple hours of outage and the labor cost of repeated truck rolls. For ROI, compare not only purchase price but also the probability of compatibility issues, warranty terms, and whether DOM telemetry is required for your monitoring workflows.
In practice, teams reduce cost by standardizing on a small set of validated part numbers per chassis generation, then holding spares sized to the expected failure rate and replacement lead times.
FAQ for OC-48 fiber module buyers and field teams
What wavelength should I choose for an OC-48 fiber module?
It depends on your existing design and optical budget. If the legacy shelf was originally deployed with 1310 nm SMF, replacing with 1550 nm can break link performance. Always match the chassis expectations and confirm the module datasheet optical parameters.
Do I need DOM support on an OC-48 fiber module?
If your NOC relies on optical telemetry for proactive maintenance, DOM is valuable for monitoring laser bias, temperature, and optical power. If you only need basic link establishment and your alarms are transport-layer only, DOM may be optional. Verify the replacement’s DOM format and what the chassis can read.
Can I use a third-party OC-48 fiber module in legacy SONET/SDH gear?
Sometimes, but compatibility is not guaranteed. Even when the module supports the same nominal rate and wavelength, electrical tolerance and monitoring register behavior can differ. The safest approach is to validate in a lab or a low-risk span before scaling to production.
How do I confirm the optical budget before swapping modules?
Measure or estimate fiber attenuation at the module wavelength, add connector and splice losses, and include a margin for aging and temperature. If you have access to optical meters at both ends, compare TX launch power and RX sensitivity readings rather than relying only on “reach” marketing claims.
What should I check first when OC-48 alarms appear after maintenance?
Start with the physical layer: correct fiber polarity, clean connectors, and confirmation of wavelength and fiber type. Then check DOM telemetry if available, and finally review transport counters and alarm logs to identify whether the issue is optical (power/sensitivity) or