If you are planning 800G infrastructure, the hardest part is not picking a transceiver model, it is making the whole optical networking path survive real rack density, cooling limits, and fiber constraints. This article helps enterprise network and data center engineers map an 800G rollout from day-one design decisions through install, verification, and troubleshooting. You will get practical selection criteria, measured deployment examples, and a step-by-step implementation plan you can hand to your rack planning or operations team.
Prerequisites and design boundaries before you touch any 800G optics
Before buying anything, lock the scope: which switches, which line cards, what optics form factors, and what fiber plant you already have. Most 800G problems I see in the field come from mismatches between switch optics support, fiber polarity conventions, or unrealistic assumptions about reach and connector loss. Also decide whether you are doing a “like-for-like” upgrade (same cabling topology, new electronics) or a “rebuild” (new MPO trunks, new breakout strategy).
Confirm switch compatibility and optics lane mapping
Expected outcome: You have the exact supported optic part numbers and the expected lane mapping for each interface.
- Pull the switch datasheet and line-card guide for your target platform (for example, QSFP-DD or OSFP based 800G ports depending on vendor).
- Verify the exact transceiver class supported and whether the platform requires a specific optic vendor for DOM behavior.
- Check if the port expects 8x lane groups, 4x lanes, or a specific breakout scheme; many 800G optical networking ports are internally structured, and polarity errors can look like “intermittent link.”
Field note: if you skip this step and rely on “it should work” compatibility, you will waste time during bring-up when the link comes up at the wrong speed or fails DOM checks.
Audit your fiber plant and connector types
Expected outcome: You know your current fiber count, link loss, connector cleanliness state, and whether you need new MPO/MTP trunks.
- Inventory existing fiber type: OS1/OS2 singlemode, OM3/OM4 multimode, and whether you can support 1310/1550 nm or only one band.
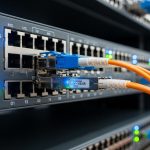
- Identify connector geometry: LC vs MPO/MTP. 800G optical networking almost always uses high-density MPO/MTP at scale.
- Measure end-to-end link loss for the candidate reach using your cabling records plus OTDR or certified loss tests.
For enterprises, the biggest surprise is often that the existing trunks are too lossy or have degraded connectors. Even if the draft budget “looks fine,” margin can evaporate after re-termination.
Define power, cooling, and rack-level constraints
Expected outcome: You have a realistic estimate of transceiver and switch system power and the cooling strategy.
- Collect transceiver power from vendor datasheets (not marketing summaries). Typical high-speed optics can be several watts per module, and 800G line cards scale quickly.
- Confirm airflow direction and target inlet temperatures. Many deployments fail because the optics sit in hot exhaust zones.
- Ensure you have enough PDU headroom and circuit capacity for the new line cards.
In rack planning, I treat optics power as “real heat,” then verify with your facility temperature profiles. If your cold aisle is already near the upper inlet limit, 800G adds risk quickly.

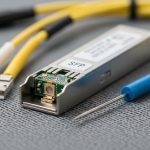
800G optical networking options: reach, wavelength, and connector reality
800G optical networking is not one single technology. It is a set of choices: wavelength band (for example, 850 nm vs 1310 nm vs 1550 nm), fiber type (multimode vs singlemode), reach target, and whether you are using QSFP-DD, OSFP, or a vendor-specific high-density form factor. The “right” answer depends on how far your ToR, leaf, spine, and end-of-row links must travel, and whether you can reuse existing multimode in the campus.
Choose your link budget strategy by distance and fiber type
Expected outcome: You pick a candidate optic family that matches your reach and your fiber plant.
- Short reach (data center): multimode options around 850 nm can be attractive when you have clean OM4 and short patching.
- Medium to long enterprise distances: singlemode options around 1310 nm or 1550 nm reduce fiber count constraints and improve reach flexibility.
- Always validate connector loss, patch panel quality, and re-termination effects using certified test results.
IEEE 802.3 defines the electrical and optical interfaces for many Ethernet rates, but your real-world success still hinges on the optics’ supported wavelength and DOM behavior. For standards context, review IEEE 802.3 specifications for 800G Ethernet interfaces via vendor alignment documents and the standard itself. [Source: IEEE 802.3]
Technical specifications comparison (what to compare, not what marketing says)
Expected outcome: You shortlist optics with correct wavelength, reach, connector type, and operating temperature.
| Optic example (form factor) | Wavelength | Target reach | Fiber type | Connector | Data rate | Operating temp (typical) | DOM |
|---|---|---|---|---|---|---|---|
| Cisco-compatible 800G QSFP-DD SR8 class (example) | ~850 nm | Up to ~100 m (varies by vendor) | OM4/OM3 multimode | MPO/MTP | 800G | 0 to 70 C class (verify spec) | Yes (SFF-8636 / vendor) |
| Finisar/FS-style 800G OSFP/800G LR8 class (example) | ~1310 nm | ~2 km (varies by vendor) | OS2 singlemode | MPO/MTP | 800G | -5 to 70 C class (verify spec) | Yes (SFF-8636 / vendor) |
| FS.com 800G ER8/DR8 class (example) | ~1550 nm | ~10 km class (varies by vendor) | OS2 singlemode | MPO/MTP | 800G | -5 to 70 C class (verify spec) | Yes (SFF-8636 / vendor) |
Examples above are representative classes; always use the exact vendor datasheet for your target optics SKU and verify DOM support and electrical interface compliance. For DOM and optical module interfaces, engineers often reference SFF standards families such as SFF-8636 and vendor-specific integration notes. [Source: SFF Committee; vendor datasheets]
Pro Tip: In 800G optical networking, the “link up” moment can still hide a polarity or lane-order issue. I have seen links pass basic checks but fail during traffic bursts because one lane group is effectively crossed, causing intermittent FEC correction stress. Treat polarity verification as a first-class step, not a “quick look” after installation.

Step-by-step implementation plan for 800G optical networking readiness
This is the practical rollout sequence I use when an enterprise team is upgrading leaf-spine or ToR to support 800G uplinks while keeping downtime tight. The goal is to reduce surprises during cutover by validating optics compatibility, fiber polarity, and power/cooling before the first production traffic hits.
Build the rack and fiber mapping model
Expected outcome: You have a port-to-fiber mapping spreadsheet and a physical cable plan that matches it.
- Create a port list for every 800G uplink or interconnect port on the switch line cards.
- Map each port to a specific MPO/MTP trunk and patch panel position. Include polarity orientation markers and identify which end is “A” vs “B” on each harness.
- Plan slack storage so you do not re-tension tight bends near the optics cage. High-speed optics are sensitive to physical handling.
Rack planning detail that matters: keep MPO/MTP bend radius within the vendor guidance, and avoid routing cables through airflow restrictions that can create hot spots around the optics area.
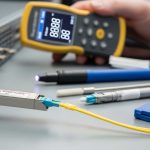
Pre-stage optics and verify DOM reachability
Expected outcome: You confirm the modules are recognized and DOM reads are healthy before you patch into production.
- Before installation in final racks, seat optics in a test switch or a designated staging chassis.
- Verify DOM fields: wavelength, vendor ID, serial, TX/RX power, and any alarm thresholds.
- Confirm transceiver temperature and that no warnings appear after a short warm-up (for example, 10 to 15 minutes under normal airflow).
If you are using third-party optics, this step becomes even more valuable because DOM quirks can show up only after the module warms up.
Install transceivers and patch with polarity discipline
Expected outcome: You have correct polarity and lane mapping, with verified optical power levels.
- Label both ends of each MPO/MTP trunk and each patch harness.
- Follow the polarity scheme required by your optic class and cabling (often “MPO polarity A/B” conventions, depending on harness type).
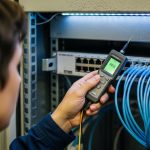
- After patching, run optical diagnostics: check RX power and confirm no high error counters during idle.
For verification, use your switch platform’s transceiver and interface diagnostics. Many platforms expose signal quality metrics and error counters that help you catch a bad harness early.
Power and cooling validation at rack level
Expected outcome: Your inlet temperatures, airflow direction, and power draw are within limits.
- Measure actual switch and line-card power draw after enabling the 800G interfaces.
- Confirm PDU capacity and breaker margins. I like to check at least 20% headroom for future expansion.
- Validate cooling airflow paths: ensure optics are not sitting in recirculation zones.
Even if optics are within operating temperature spec on paper, poor airflow can push the module into a higher temperature band that accelerates aging.

Selection criteria checklist engineers use for 800G optics
When teams debate which optics to buy, they often focus on “reach” and forget the operational constraints that dominate cost and uptime. Here is the ordered checklist I recommend for optical networking in an 800G enterprise rollout.
- Distance and reach: confirm the maximum link distance including patch panels and slack fiber, not just the trunk length.
- Budget and total loss: validate certified loss and margin for your exact connector count and splice policy.
- Switch compatibility: confirm supported optic form factor and exact vendor validation approach from the switch vendor.
- DOM and monitoring: ensure DOM is supported and alarms map cleanly into your monitoring stack.
- Operating temperature range: confirm module spec and ensure your rack inlet temperature profile stays within limits.
- Vendor lock-in risk: decide if you can standardize on OEM optics or if third-party optics are acceptable with a validation plan.
- Repair and spares strategy: keep a small pool of known-good optics and harnesses for rapid swap during troubleshooting.
- FEC and error tolerance: verify how the platform reports FEC corrected errors and what thresholds trigger alerts.
Common pitfalls and troubleshooting for 800G optical networking
If you have ever rolled out high-speed optics, you know the same failure modes repeat. Below are the top issues I see, with root cause and what to do next. Use these as your troubleshooting decision tree when bring-up goes sideways.
Failure point 1: Link does not come up or negotiates incorrectly
Root cause: Unsupported optic type or form factor for the specific line card, or a DOM compatibility check failing. Sometimes the optics physically seat but the platform rejects them.
Solution: verify the exact supported optics list for your switch model and line-card revision; reseat optics; confirm DOM readings in a staging environment; update firmware if your vendor requires it. [Source: switch vendor line-card guide]
Failure point 2: Link flaps under traffic load
Root cause: polarity or lane mapping mismatch, or a marginal optical budget that only fails during higher error correction stress. Cleanliness issues can also create intermittent RX power drops.
Solution: re-check MPO/MTP polarity and harness orientation; clean connectors with proper inspection tools; re-run RX power and error counter checks during controlled traffic bursts; replace the patch harness first before touching the trunk.
Failure point 3: High error counters with no obvious link-down
Root cause: insufficient link margin due to connector loss, too many patch points, or poor bend radius during cable management. Another common cause is a dirty connector that passes initial checks but degrades over time.
Solution: use certified test results to confirm loss budget compliance; inspect and clean; validate physical cable routing and bend radius; if needed, shorten the optical path or reduce patch panel hops.
Cost and ROI considerations: OEM vs third-party optics for 800G
800G optical networking optics cost can vary widely based on wavelength band, reach, and whether you buy OEM-only. In many enterprise deployments, OEM optics can be several hundred to over a thousand dollars per module depending on class and current market pricing, while third-party modules are often cheaper but require more validation time.
For ROI, look beyond purchase price: include downtime risk, spares stocking, and power/cooling impacts. If third-party optics reduce cost but increase failure rate or bring-up time, the TCO can flip. My rule of thumb: only standardize third-party optics after you complete a measured acceptance test that includes temperature soak, DOM alarm checks, and traffic validation.
FAQ: 800G optical networking decisions enterprise teams still ask
What fiber type should I plan for 800G in an enterprise data center?
Most enterprises plan for singlemode OS2 for longer reach and operational flexibility, especially for leaf-spine distances that exceed typical multimode reach. If your links are strictly short and you have clean OM4 with good loss margins, multimode can work. Validate with certified loss tests and your switch vendor’s supported optic list.
How do I avoid polarity mistakes with MPO/MTP in high-density racks?
Use a port-to-fiber mapping sheet that includes polarity orientation and harness identity, then follow a consistent labeling convention on both ends. During installation, inspect connector end faces and verify polarity before you run production traffic. Treat polarity verification as a mandatory step, not a best-effort check.
Do I need to worry about DOM support and monitoring?
Yes. DOM support affects how your platform reports optical power, temperature, and alarm thresholds. If DOM fields differ or are not fully compatible, you can lose visibility into early degradation signals, which increases risk during maintenance windows.
What temperature issues show up first when moving to 800G?
Rack inlet temperature and airflow recirculation near the transceiver cages are common early issues. Even when modules are within spec, poor airflow can push them into higher temperature operating bands that accelerate aging. Measure inlet temps during peak load and confirm airflow direction and obstructions are resolved.
Is it safe to mix OEM and third-party optics?
It can be safe, but only if the switch vendor supports it and you complete acceptance testing for each optic class. Mixing can complicate troubleshooting because DOM behavior and alarm thresholds may differ. Standardize whenever possible and keep a documented validation record.
What should my acceptance test include before declaring the 800G rollout complete?
Include DOM health checks, RX/TX power verification, error counter monitoring under realistic traffic, and a cleanliness/polarity verification pass. Also run a temperature and duration soak if your operations team can support it. This catches issues that only appear after optics warm up or during sustained load.
If you want a smoother 800G migration, start by locking compatibility and fiber mapping, then validate power and polarity before you cut over. Next, review rack-level power and cooling practices using related topic so your optical networking gear runs within spec from day one.
Author bio: I am a data center engineer who designs rack plans, power distribution, and fiber layouts for high-speed optical networking deployments. I have done hands-on bring-up and troubleshooting across multiple switch platforms, focusing on measurable link budgets, thermal margins, and operational readiness.
Author bio: I help teams avoid expensive surprises by translating vendor optics specs into real-world install procedures, acceptance tests, and spares strategies for enterprise scale.