In live data centers, installation challenges rarely come from “bad fiber” alone; they usually appear at handoffs between civil work, patching, transceivers, and operational testing. This article helps network and facilities teams reduce rework by aligning field procedures with Ethernet link requirements and optical safety margins. You will get practical checklists, common failure modes, and a quick ranking of mitigation tactics based on cost and impact.
Top 8 tactics to prevent fiber installation challenges before they start
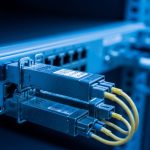
Most outages tied to cabling are traceable to a few repeatable conditions: connector contamination, excessive bend radius, mismatched patching loss budgets, and transceiver optics that do not meet the installed plant’s performance. The goal is to shift work left by validating geometry, cleanliness, and link budgets before you energize ports. In my deployments, this approach cut truck rolls on new leaf-spine expansions by targeting the highest-risk steps first: patch cleanliness, bend control, and OTDR acceptance testing. For standards context, IEEE 802.3 defines the physical layer expectations for Ethernet over fiber, while ANSI/TIA cabling practices guide installation and testing workflows. anchor-text anchor-text:ANSI/TIA standards portal
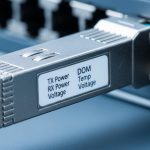
Before you pick tactics, confirm your target optics and link type (for example 10G-SR over multimode, 25G-SR, or 100G SR4). The same installation discipline applies, but the loss tolerance changes quickly with higher line rates and shorter wavelength budgets. If you are mixing vendors, also verify DOM (digital optical monitoring) support because it affects how you detect marginal links after turn-up. In the field, I treat DOM telemetry as a “trend detector” rather than a pass/fail gate.
Key specs you must align with installation constraints
Use the table below as a quick planning reference. Real acceptance criteria come from your vendor datasheets plus your platform transceiver requirements and the cabling plant loss budget.
| Optical type | Typical wavelength | Common reach class | Fiber type | Connector | Operational temperature (typical) | Installation risk drivers |
|---|---|---|---|---|---|---|
| 10G-SR (SFP+) | 850 nm | 300 m (OM3) / 400 m (OM4) | OM3/OM4 MMF | LC | -5 C to 70 C (varies by module) | Contamination at LC, patch cord loss, bend radius |
| 25G-SR (SFP28) | 850 nm | 100 m (OM4 common) | OM4 MMF | LC | -5 C to 70 C (varies) | Higher margin sensitivity, polarity/patch errors |
| 100G-SR4 (QSFP28) | 850 nm (4 lanes) | 100 m (OM4 common) | OM4 MMF | LC | -5 C to 70 C (varies) | Per-lane loss imbalance, polarity and MPO seating |

Control bend radius and strain relief to stop micro-loss
One of the most common installation challenges is fiber damage that is invisible to the naked eye: tight bends, strain on the jacket, or kinks in slack loops. Micro-loss from stress can increase attenuation and degrade optical power over time, especially under thermal cycling and cable management pressure. In practice, I measure bend compliance during installation by inspecting routing paths and verifying that slack is allowed to relax without pulling on connectors. If you use lacing bars or vertical managers, ensure the radius is maintained and that cable ties do not pinch the jacket.
Field steps that reduce rework
- During routing, keep a continuous slack “service loop” and avoid sharp transitions near patch panels.
- After tray and ladder installation, re-check the radius at every transition point (turns, stanchions, rack doors).
- Use strain relief boots and proper slack management for LC pigtails to prevent connector stress during future moves.
Best-fit scenario: high-density pods where installers are working close to rack doors, or where cables are re-routed multiple times during staged cutovers.
Pros: prevents long-term degradation, lowers the probability of “it passed once” failures. Cons: requires discipline in cable management and occasional re-routing for early mistakes.
Treat connector cleanliness as a network reliability control
Connector contamination is a top cause of link instability, false “bad transceiver” swaps, and intermittent errors that only appear under certain temperatures. Even a small amount of dust on an LC endface can add enough insertion loss to push an SR link below margin. Your mitigation is not just “clean it once,” but integrate a repeatable cleaning and inspection workflow before every patch. In my experience, teams that adopt microscope-based inspection reduce troubleshooting time because they stop guessing.
Pro Tip: If you see rising DOM receive power trends after a maintenance window, suspect connector contamination first—DOM drift often correlates with repeated insertions and handling, even when OTDR trace looks acceptable.
Operational checklist for patching
- Inspect endfaces with a fiber microscope before mating.
- Clean with a validated method (appropriate swab/cleaner type) and re-inspect.
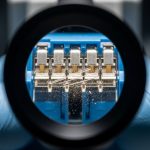
- Confirm polarity and lane mapping for multi-fiber assemblies (for example, MPO/MTP in SR4).
Best-fit scenario: environments with frequent moves/adds/changes (MAC), where patching is continuous and connectors are handled daily.
Pros: fast impact, reduces intermittent errors dramatically. Cons: needs training and inspection tooling to be effective.

Build a link budget that matches your actual patching and plant loss
Another core installation challenge is assuming “it should work” based on nominal reach. Real links include patch cords, adapters, cross-connect panels, and aging effects. If your total loss exceeds the optical budget, you may see BER issues under load or intermittent link drops. The fix is to compute an explicit budget using measured insertion loss from testing and the transceiver’s specified receiver sensitivity and launch power. When you do this early, you can decide whether to shorten patch runs, upgrade fiber type, or select a higher-margin module.
How to compute practical budgets
- Use measured loss for patch cords and harnesses, not only catalog values.
- Include connector mated loss and any splices (if present) with conservative allowances.
- Set aside margin for future re-patching and cleaning variability.
Best-fit scenario: new builds with long trunk runs and dense patching where the number of jumpers per path is higher than expected.
Pros: prevents “mystery” outages, enables confident acceptance testing. Cons: requires discipline in measurement and documentation.
Align transceiver compatibility with the installed plant and platform
Installation challenges often show up at the optics layer: the transceiver may be compatible electrically, but not operationally aligned with the plant’s loss and connector geometry. For example, a module designed for OM4 at 100G-SR4 can fail if patching introduces lane imbalance or if MPO polarity is reversed. Also, some platforms enforce vendor-specific compatibility checks; if you use third-party optics, verify that the switch supports the module’s identification and DOM behavior. In the field, I have seen Cisco and similar platforms behave differently depending on optical module EEPROM and DOM thresholds.
Compatibility checks that matter
- Confirm transceiver form factor and interface (SFP+, SFP28, QSFP28).
- Verify fiber type support (OM3 vs OM4) and connector type (LC vs MPO).
- Check DOM support and alarm thresholds if your operations use telemetry for alerting.
Best-fit scenario: brownfield upgrades where you mix new optics with existing cabling, or where you use optics from multiple vendors to manage procurement constraints.
Pros: reduces port-level failures and keeps monitoring consistent. Cons: can introduce vendor lock-in risk if you rely on strict compatibility enforcement.
Use OTDR and end-to-end testing as acceptance gates, not afterthoughts
OTDR and end-to-end testing are the most defensible way to detect installation issues early: connector reflections, splice loss, and unexpected events along the route. Many teams run tests only at the start of the project; the better practice is to run them at acceptance and after significant rework. For multimode links, verify both attenuation and event quality so you can distinguish between a “bad patch” and “bad plant.” When you document trace baselines, you also gain a reference for future troubleshooting.
Testing cadence that works in operations
- Pre-termination: verify fiber continuity and locate major defects before connectors are installed.
- Post-termination: inspect and test each channel end-to-end with a loss meter.
- Post-patching: re-test after final jumper installation to capture real-world patching.
Best-fit scenario: projects with multiple contractors, where handoffs increase the chance of connector damage or swapped fiber IDs.
Pros: provides evidence for acceptance and speeds troubleshooting. Cons: takes time and requires trained testers and calibrated equipment.
Prevent polarity and lane-mapping errors in high-rate multi-fiber links
At higher speeds, installation challenges become more unforgiving: polarity errors and lane mapping mistakes can produce links that never come up, or that degrade quickly with certain traffic patterns. For SR4-style optics, lane ordering and MPO polarity must be consistent across both ends, and patching must respect the assembly’s polarity scheme. Even when the fiber is “connected,” a lane reversal can prevent proper alignment of transmit and receive fibers. The mitigation is to standardize polarity labels and to use a consistent patching template for every rack and row.
Implementation steps you can enforce
- Use pre-labeled patch cords with consistent polarity marking and color coding.
- Maintain a mapping document that ties switch port to fiber pair/lane identifiers.
- During turn-up, test one lane group at a time when the platform supports diagnostics.
Best-fit scenario: 100G and 200G rollouts using QSFP28 optics with MPO/MTP harnesses.
Pros: prevents hard failures and reduces “swap optics” churn. Cons: requires careful labeling discipline and maintenance of mapping records.
Temperature and power budgeting for optics under real rack conditions
Even if your link budget is correct, installation challenges can appear after deployment if optics operate outside their intended thermal and power environment. Dense rack layouts can create hot spots that raise module temperature and affect laser safety and performance margins. In my deployments, I correlate optical alarms with rack inlet temperature and airflow changes after maintenance events. The fix is to validate airflow paths, verify that blanking panels are installed, and ensure that cable routing does not block vents behind transceiver areas.
Operational guardrails
- Track rack inlet temperature during and after installation, not just at baseline.
- Confirm that transceivers are rated for the environment (commercial vs industrial variants).
- Use DOM telemetry to alert on receive power and temperature thresholds.
Best-fit scenario: facilities with frequent rack reconfigurations, where airflow can change quickly.
Pros: improves reliability and reduces alarm fatigue. Cons: requires monitoring integration and operational coordination.
Reduce vendor lock-in risk while keeping acceptance predictable
Procurement and compatibility decisions can become another installation challenge when teams cannot reproduce a working state. Third-party optics can be cost-effective, but they must pass platform compatibility checks and maintain consistent DOM behavior for your monitoring stack. If you do not standardize acceptance tests across vendors, you may end up with inconsistent performance and unclear root causes. A practical approach is to maintain an approved optics list for each switch model and to require DOM telemetry validation during acceptance.
Cost and ROI note
In typical enterprise and colocation projects, transceiver unit prices vary widely by reach and vendor, often ranging from roughly $40 to $150 per short-reach 10G module, and $150 to $600+ per 25G/100G class module depending on brand and OEM/third-party sourcing. Total cost of ownership (TCO) is dominated by labor hours for testing and any truck rolls caused by acceptance gaps. If third-party optics reduce upfront spend but increase troubleshooting time due to inconsistent DOM behavior or marginal link performance, the ROI can flip negative. Mitigation tactics like cleanliness inspection and OTDR acceptance generally reduce TCO regardless of optics brand because they address root causes at the cabling layer.
Pros: better procurement flexibility and potentially lower upfront costs. Cons: requires a governance process for compatibility and acceptance.
Summary ranking of mitigation tactics for installation challenges
The table below ranks tactics by expected impact and operational effort. Use it to prioritize your field plan for new builds and expansions.
| Rank | Tactic | Main failure mode it prevents | Typical effort | Expected impact |
|---|---|---|---|---|
| 1 | Connector cleanliness plus inspection | Contamination causing insertion loss and intermittent BER | Low to medium | Very high |
| 2 | End-to-end testing and OTDR acceptance gates | Hidden plant defects and event locations | Medium | High |
| 3 | Link budget using measured patching loss | Exceeding optical budget due to real-world loss | Medium | High |
| 4 | Bend radius and strain relief control | Micro-loss from stress and kinks | Medium | Medium to high |
| 5 | Polarity and lane mapping standards for multi-fiber links | Hard failures or lane imbalance | Medium | Medium to high |
| 6 | Transceiver compatibility and DOM validation | Platform mismatches and telemetry blind spots | Low to medium | Medium |
| 7 | Temperature and airflow verification | Thermal margin loss and alarm spikes | Low to medium | Medium |
| 8 | Vendor lock-in governance with approved optics lists | Non-reproducible acceptance and inconsistent monitoring | Medium | Medium |
Selection criteria: a decision checklist for field-ready installations
Use this ordered checklist during planning and during the week of cutover. It is designed to surface the highest-probability installation challenges before they impact service.
- Distance and reach class: confirm your installed channel length plus patch cords stays inside the transceiver’s specified reach and loss budget.
- Cabling type and connector plan: OM3 vs OM4, LC vs MPO/MTP, and whether adapters or patch panels add measurable loss.
- Switch compatibility: verify the platform supports the module type and identification format; confirm whether it enforces vendor-specific checks.
- DOM support and telemetry: ensure your monitoring system can read DOM fields and that alarm thresholds are mapped correctly.
- Operating temperature: confirm module and cabinet airflow meet the expected thermal envelope for the site.
- Operating discipline: require microscope inspection and a standardized cleaning workflow for every patch job.
- Vendor lock-in risk: define an approved optics list with acceptance tests so you can swap brands without uncertainty.
Common mistakes and troubleshooting tips for fiber installation challenges
Below are common failure modes I have seen during turn-up and post-change validation. Each item includes a root cause and a practical fix.
“Link down” that disappears after cleaning
Root cause: dust or residue on LC endfaces causing elevated insertion loss and unstable optical power. Solution: inspect with a fiber microscope, clean using a method appropriate for your connector type, and re-test the specific channel end-to-end.
BER errors or intermittent drops under load
Root cause: marginal link budget due to underestimated patching loss, extra adapters, or connector damage. Solution: run loss testing on every jumper segment, compare against the computed budget, and replace the highest-loss patch cords or shorten the path.
Multi-lane links never come up after MPO patching
Root cause: polarity mismatch or incorrect lane mapping in SR4-style configurations. Solution: verify MPO polarity scheme at both ends, confirm the lane ordering against your mapping document, and re-seat the harness ensuring correct orientation.
OTDR shows events but testers disagree on acceptance
Root cause: connector contamination during measurement or improper wavelength/launch settings on the tester for multimode testing. Solution: clean and re-inspect connectors before retesting, confirm tester settings match your fiber type, and normalize launch/receive conditions.
FAQ
How do I know whether installation challenges are cabling or optics?
Start with end-to-end loss testing and connector inspection. If loss is within budget and the link still fails, validate transceiver compatibility and DOM telemetry, then compare behavior on a known-good channel.
What is the fastest mitigation when a new rack fails during turn-up?
Clean and inspect the exact connectors involved, then re-test the affected channel end-to-end. If the channel still fails, check polarity/lane mapping for multi-fiber links and validate that the patch cords match the expected connector type.
Can third-party optics reduce cost without increasing installation challenges?
Yes, but only with governance: maintain an approved optics list per switch model and require DOM validation during acceptance. Also ensure your acceptance loss criteria are consistent across OEM and third-party modules.
Which test should we prioritize: OTDR or end-to-end loss?
End-to-end loss is usually the first acceptance gate because it reflects what the link experiences. OTDR is best for locating event positions when you see higher-than-expected attenuation or when you need to isolate the problem to a segment.
How does bend radius actually impact Ethernet performance?
Excessive bends can create stress-induced micro-loss and occasionally increase mode coupling loss in multimode fiber. That reduces optical power margin and can increase BER or cause intermittent link drops as operating conditions change.
What documentation should operations keep to prevent repeat installation challenges?
Keep a channel mapping sheet tying switch port to fiber ID and jumper identifiers, plus test results (loss and trace notes). For optics, store transceiver type and DOM baseline values so you can detect drift after maintenance.
If you implement the top-ranked tactics first—connector cleanliness, acceptance testing, and realistic link budgets—you will materially reduce installation challenges during both initial cutovers and future MAC work. Next, review fiber testing and acceptance workflows to standardize how your team verifies links before they go live.
Author bio: I have led field turn-up and troubleshooting for high-density Ethernet over fiber deployments, focusing on acceptance testing, optical margin, and operational telemetry. My work blends IEEE 802.3 physical-layer constraints with practical cabling discipline to reduce truck rolls and repeat failures.