Optical links failing in a high-density rack can look mysterious: one minute traffic is flowing, the next you see flaps, LOS, or CRC spikes. This playbook helps network and field engineers run a repeatable troubleshooting workflow for fiber transceiver and link problems in data center ops. You will get practical checks, compatibility cautions, and the exact measurements that usually reveal the root cause.
Prerequisites before you touch a single fiber
Before swapping modules, make sure you can observe the link state and verify physical layer behavior. In real deployments, rushing into a “replace the optics” cycle burns hours and can also break vendor support agreements. Aim to collect evidence first: switch transceiver diagnostics, interface counters, and a quick fiber path map.
What you should have on hand
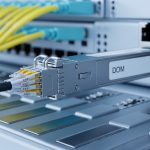
- Inventory list: switch model, port number, transceiver part numbers (example: Cisco SFP-10G-SR, Finisar FTLX8571D3BCL, FS.com SFP-10GSR-85), and vendor of each module.
- Diagnostics access: switch CLI access to read optics DOM info (digital optical monitoring) and interface counters.
- Light and inspection tools: fiber end-face inspection scope, microfiber wipes, approved cleaning kit.
- Reference gear: optical power meter and stable light source when possible, plus known-good patch cords.
- Documentation: labeling convention for MPO trunks and patch panels.
Expected outcome: You can identify whether the failure is optical power/quality, transceiver incompatibility, or a fiber/connector issue before you swap anything.

Step-by-step implementation workflow for optical link troubleshooting
This section is written as a numbered runbook. It starts with the highest-signal checks that avoid unnecessary swaps, then moves to deeper optical validation and physical cleanup. Follow it in order, and you will usually converge on the root cause within an hour.
Confirm the symptom pattern and scope
Look at whether the problem is one port, a group of ports, or multiple links on the same fabric. Also check if symptoms correlate with recent changes: patching, transceiver replacement, firmware upgrades, or cable re-routes.
- On the switch, capture interface state and counters (errors, drops, and link flaps).
- Read DOM fields: received power (Rx), transmitted power (Tx), temperature, and bias current.
- Note whether the link is negotiating at the expected speed (for example, 10GBASE-SR vs downshift behavior).
Expected outcome: You classify the issue as likely physical-layer (optical budget, cleaning, polarity) vs likely compatibility (wrong module type) vs likely configuration (speed/fec mismatch).
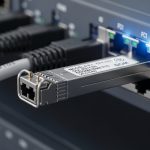
Validate transceiver compatibility and DOM sanity
In dense environments, a surprisingly common failure mode is a module that is “electrically compatible” but not operationally compatible with the specific host transceiver requirements. Check that the module type matches the expected standard and that DOM readings look plausible for the vendor.
For example, 10GBASE-SR optics typically use 850 nm over multimode fiber. In a typical leaf-spine environment, engineers might mix vendor optics, but they still must match the host’s supported optics and reach class.
Quick checks: confirm wavelength/Tx type, and confirm DOM fields are not all zeros or stuck values. If DOM is unavailable, the host may be rejecting the module, or you may have a bad module seat.
Expected outcome: You rule out “wrong optics for the port” and “host rejecting the module” before touching fiber.
Measure optical power and compare to the link budget
Where you can, measure Rx optical power at the receiver end. Then compare it to the module and host guidance. If Rx is near the minimum threshold, the link can flap under temperature changes or after minor connector contamination.
Real data center ops trick: DOM Rx power that is consistently low can still show “link up” until the BER rises, then you see CRC errors and retransmits. That is why you should correlate DOM with interface error counters.
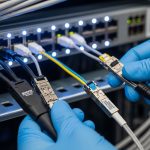
Inspect and clean connectors before replacing parts
Cleaning is not optional at high density. Even “new” patch cords can have residue from handling. Use an inspection scope to verify end-face cleanliness, especially on LC and MPO fanout interfaces.
- Inspect both ends of the link segment you suspect.
- Clean using approved methods (dry wipes are not the same as connector cleaning kits).
- For MPO, verify polarity and check for damaged keys or mis-seated polarity guides.
Expected outcome: You eliminate contamination and connector damage as the primary cause.
Verify fiber polarity and MPO mapping
For multi-fiber links (MPO/MTP), polarity errors are a top cause of “no light” or intermittent behavior. Verify mapping end-to-end: transmit pair to correct receive pair, and ensure polarity adapters match the standard used in your cabling plan.
Also check that patch panel jumpers are not swapped between rows. In dense cable plants, a label can be wrong even when the patch cord is correct.
Expected outcome: You confirm the optical paths are mapped correctly for the transceiver’s transmit/receive lanes.
Re-seat and test with known-good optics and cords
If inspection and power checks do not resolve the issue, you move to controlled substitution. Use a known-good module and a known-good patch cord to isolate whether the fault is in the module, the cable, or the connector interface.
- Re-seat the transceiver and confirm it locks firmly.
- Swap only one variable at a time: module first, then patch cord, then permanent link segment.
- Watch DOM and interface counters after each swap.
Expected outcome: You isolate the failing component without random trial-and-error.
Document results and set a prevention rule
Once resolved, record: the failing symptom, DOM before/after, what was cleaned or swapped, and the final measured Rx power if you have it. Then update your operational checklist: for example, “inspect end-face before first swap” or “verify MPO polarity adapters on every remap.”
Expected outcome: You prevent repeat incidents and provide evidence for vendor RMA support if needed.

Key optical specs and what they mean in day-to-day data center ops
Optical troubleshooting is easier when you understand the specs that govern link behavior. Engineers often jump straight to cleaning, but knowing typical wavelength, connector type, reach, and monitoring thresholds helps you interpret symptoms correctly.
Below is a practical comparison of common short-reach modules used in data center ops. Note that exact reach depends on the fiber plant, patch cord quality, and connector cleanliness.
| Module / Standard | Wavelength | Typical Data Rate | Reach (OM3/OM4 MMF) | Connector | Operating Temp | Use Case in Data Center Ops |
|---|---|---|---|---|---|---|
| 10GBASE-SR (SFP+) | ~850 nm | 10 Gbps | ~300 m (OM3), ~400 m (OM4) typical | LC | 0 to 70 C (common) | Top-of-rack to spine, short patch runs |
| 10GBASE-SR (SFP+ example) | 850 nm | 10 Gbps | ~400 m on OM4 typical | LC | -5 to 70 C (varies by vendor) | Higher density where OM4 is available |
| 25GBASE-SR (SFP28) | ~850 nm | 25 Gbps | ~70 m (OM3), ~100 m (OM4) typical | LC | 0 to 70 C (common) | Short links in modern 25G leaf/spine |
| 100GBASE-SR4 (QSFP28) | ~850 nm | 100 Gbps | ~100 m (OM4 typical) | MPO-12 | 0 to 70 C (common) | High density spine uplinks and aggregation |
Notes: Exact reach numbers depend on your transceiver vendor, fiber type (OM3 vs OM4), and measured optical budget. Always rely on the vendor datasheet for that specific part number and the host’s supported optics list.
Sources: [Source: IEEE 802.3] [Source: ANSI/TIA-568.3-D] [Source: Cisco transceiver compatibility guidance and vendor datasheets] anchor-text:IEEE 802.3 anchor-text:ANSI/TIA-568 cabling standards
Expected outcome: You can interpret “why this module flaps” in terms of optical budget and monitoring behavior, not guesswork.
Pro Tip: In many real incidents, the link stays up until it does not. DOM Rx power might look “okay” while BER climbs silently, then you see CRC and link renegotiations when the system crosses the effective error rate threshold. That’s why you should pair DOM readings with interface error counters, not only link state.

Real-world deployment scenario: leaf-spine ops with mixed optics and MPO
Imagine a 3-tier data center ops network: 48-port 10G ToR switches feeding 25G/100G leaf uplinks, then a spine layer with 100G QSFP28. On one row, an operator remaps several MPO-12 patch cords to change bandwidth distribution, then reports intermittent LOS on 100GBASE-SR4 uplinks. The environment uses OM4 MMF with MPO trunks through patch panels, and the host switch logs show Rx power dips and rising CRC counts before the link drops.
During troubleshooting, the team compares DOM readings across affected ports and finds that only the remapped group has significantly lower Rx power, while temperature and bias current remain normal. They inspect the MPO end faces, discover residue on one fanout connector, clean both ends, then confirm polarity with the correct MPO adapter orientation. After cleaning, DOM Rx power returns to the expected range and CRC counters stop climbing.
Expected outcome: You resolve the issue by validating polarity and end-face cleanliness, not by swapping multiple optics unnecessarily.
Selection criteria checklist for optics when you are troubleshooting and replacing
Sometimes you replace optics during a fix, but the replacement must be correct for the host and the fiber plant. Use this ordered checklist to avoid reintroducing a new failure mode.
- Distance and fiber type: confirm OM3 vs OM4, patch cord lengths, and permanent link length. If you are near the reach limit, cleanliness becomes critical.
- Data rate and standard: match 10GBASE-SR, 25GBASE-SR, or 100GBASE-SR4 exactly. Do not assume “850 nm means the same thing.”
- Connector and breakout method: LC for SFP/SFP+ and SFP28, MPO-12 for QSFP28 SR4. Ensure patch panels and jumpers match the physical format.
- Switch compatibility and supported optics list: check the host vendor’s transceiver compatibility matrix. Some hosts enforce stricter vendor/device rules.
- DOM support and threshold behavior: confirm the module provides DOM and that the host can read it reliably. Watch for missing or abnormal DOM values.
- Operating temperature range: verify it matches your room and airflow conditions. Hot aisle recirculation can push optics toward upper limits.
- Vendor lock-in risk: weigh OEM vs third-party. If your organization requires standardized optics, plan replacements accordingly.
Expected outcome: Replacement optics are likely to work immediately and remain stable under the same operational stressors that triggered the original incident.
Common mistakes and troubleshooting tips that save hours
Below are the failure modes engineers see most often in data center ops optical incidents. Each includes the likely root cause and a concrete fix.
Swapping optics without cleaning first
Root cause: connector end-face contamination causes excess insertion loss. The new module still receives too little light, so the link flaps again.
Solution: inspect both ends with a fiber scope, clean with an approved method, then re-test. If you cannot inspect, at least clean and re-seat, but inspection is the best practice.
MPO polarity error after remap
Root cause: MPO fanout orientation or polarity adapter mismatch routes transmit lanes to the wrong receive lanes. Symptoms often include link up/down cycles or high error rates.
Solution: verify polarity end-to-end using your cabling standard and the adapter type. Use known-good MPO jumpers and confirm the lane mapping physically, not just by label.
Mixing optics that are “850 nm” but not the same reach class
Root cause: vendors may implement different optical power targets and reach budgets even within the same nominal wavelength. A marginal link that previously ran can fail after minor moves or temperature drift.
Solution: check datasheets for the exact part number: Tx power, Rx sensitivity, and supported fiber type. If you are near the budget, shorten jumpers or move to OM4-certified paths.
Ignoring DOM anomalies and only watching link state
Root cause: link state can remain “up” while BER rises. CRC counters climb until the system crosses a threshold and the link drops.
Solution: collect DOM Rx/Tx, compare across ports, and correlate with CRC or error counters immediately after each change.
Expected outcome: You avoid the most expensive mistakes and converge faster on the actual root cause.
Cost and ROI note: OEM vs third-party optics in data center ops
In many shops, OEM optics cost more upfront but can reduce support friction. Third-party optics often lower initial CAPEX, but the ROI depends on your incident rate and your ability to validate compatibility and DOM behavior. Typical street pricing varies widely, but short-reach modules can range from low tens to a few hundred dollars per unit depending on speed (10G vs 100G), brand, and form factor.
For TCO, include: labor time during incidents, downtime risk, cleaning and inspection consumables, and the probability of RMA. In one practical pattern, teams that standardize on a small set of validated part numbers reduce both mean time to repair and the number of “double swaps” during troubleshooting. If you go third-party, invest in a validation lab process: test known-good with your specific switch models and fiber plant.
FAQ: optical troubleshooting questions from real buyers
How do I tell if the issue is the fiber or the transceiver?
Use controlled substitution: swap only the transceiver first with a known-good module, then swap the patch cord. If the problem follows the module, it is likely transceiver-related; if it follows the cord or permanent link segment, it is likely fiber/connector or polarity.
What DOM readings should I watch during data center ops troubleshooting?
Focus on Rx power, Tx power, temperature, and bias current. Compare with a known-good port on the same switch and interpret trends: low Rx power plus rising CRC often points to insertion loss from contamination or damage.
Is cleaning always the first step?
In high-density environments, yes, cleaning is often the fastest path to recovery because contamination is common and reversible. However, still do a quick compatibility check first so you do not waste time cleaning a link that has polarity or wrong-standard behavior.
Can MPO polarity mistakes cause intermittent behavior, not just total failure?
Yes. If lane mapping is partially correct or if connectors are marginally seated, you can see flaps, partial traffic loss, or escalating errors before the link drops. Treat polarity verification as a must after any remap.
What is the best way to prevent repeat optical incidents?
Standardize optics part numbers, require end-face inspection for any remap, and document reach budgets by port group. Also track which patch panels and jumpers cause recurring issues so you can plan targeted cabling maintenance.
Should I mix vendors for optics across the same switch?
Many data center ops teams do mix vendors, but you must confirm host compatibility and validate that DOM behavior is consistent. If your host enforces strict optics checks, mixing may trigger alarms or unstable performance.
If you want the next step after fixing today’s fault, use fiber-cleaning-and-polarity-prevention to build a repeatable prevention routine for every remap. Once your processes are consistent, optical incidents usually drop from “mystery events” to predictable, measurable maintenance work.
Author bio: I have deployed and troubleshot Ethernet optical links in real data centers, including MPO polarity validation, DOM correlation, and field RMA workflows. I write runbooks that field engineers can follow under time pressure, with measurable checks instead of guesswork.