In modern leaf-spine fabrics, the optics layer becomes the bottleneck for both throughput and operational risk. This article helps network engineers and data center field teams decide between 400G vs 800G transceivers when planning high-density upgrades, new linecards, and migration paths that minimize downtime. You will get concrete selection criteria, deployment math, troubleshooting patterns, and an end ranking that reflects real-world constraints.
Top 1: Choose the right lane architecture for 400G vs 800G
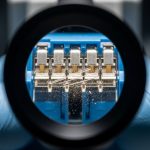
At the physical layer, the main difference is how many optical lanes and electrical signaling paths are aggregated to reach the target data rate. In practice, 400G transceivers are commonly built around 8x or 16x lane groupings (often within an Ethernet/optical transport framing model), while 800G designs typically use higher lane counts or tighter lane aggregation to halve the number of optics needed per unit of bandwidth. This impacts board routing complexity, thermal density, and how vendors implement DSP and FEC.
From a deployment standpoint, lane architecture affects how you budget for retimers, backplane reach, and optical power margins. If your switch platform already supports 400G port densities well, moving to 800G can reduce port count but increases per-module complexity and can stress power delivery and cooling headroom.
Best-fit scenario: You are upgrading a constrained cabinet where you must increase throughput per rack position, and your switch chassis has verified 800G optics support with validated optics vendor lists.
- Pros: 800G can reduce the number of optics and switch ports required for the same aggregate bandwidth.
- Cons: 800G modules are typically more demanding on thermal design and signal integrity; compatibility lists matter more.

Top 2: Compare optics reach and wavelength options that match your fiber plant
Before choosing 400G vs 800G, validate your installed fiber plant: core type, patch panel cleanliness, connector loss, and planned splitter topology. Most data center short-reach optics for both 400G and 800G target the ~850 nm nominal window for multimode fiber (MMF) and use OM4/OM5 grades, while longer-reach variants use single-mode wavelengths around 1310/1550 nm depending on vendor and standard mode. Reach ratings are not a single number; they are derived from launch power, receiver sensitivity, differential mode delay constraints (for MMF), and link budget assumptions.
Engineers often standardize on MMF for intra-cluster and use SMF for inter-building. If you are planning an 800G rollout, confirm whether your switch supports the same cable plant for both module types or if it forces a different fiber grade or patching strategy.
| Spec category | Typical 400G short-reach (MMF) | Typical 800G short-reach (MMF) | What to verify |
|---|---|---|---|
| Target wavelength | ~850 nm | ~850 nm | Vendor datasheet wavelength and mode condition |
| Connector | Commonly MPO/MTP | Commonly MPO/MTP | MPO polarity handling and keying |
| Reach (typical class) | Up to ~100 m on OM4/OM5 class (varies) | Up to ~100 m on OM4/OM5 class (varies) | Exact reach for your fiber type and link budget |
| Data rate | 400G per module | 800G per module | Switch port profile support |
| Operating temperature | Commercial or industrial grade (varies) | Commercial or industrial grade (varies) | Ambient and module class in your rooms |
| DOM / monitoring | Usually supported | Usually supported | DOM compatibility with your telemetry stack |
Best-fit scenario: Your fiber plant is OM4/OM5 with verified insertion loss; you can keep patch lengths within the vendor’s rated reach for the exact module family you will deploy.
- Pros: MMF short-reach keeps installation cost predictable and avoids long SMF splicing.
- Cons: Reach is sensitive to MPO cleanliness, polarity, and patch panel aging; 800G margins can be tighter.

Top 3: Power, thermal density, and rack-level constraints
In high-performance data centers, the optics decision is constrained by power delivery and cooling capacity as much as by link speed. 800G modules typically draw more power per module than 400G, and because they are deployed in higher density, the local temperature rise around the cage can reduce optical output stability and increase fan curves. From a field perspective, the key is not only average module power but also transient behavior during hot-swap events and link re-training.
Operationally, measure inlet temperature and verify that your switch chassis thermal model supports the module class. If your facility uses CRAH/CRAC with aggressive setpoints, validate that airflow bypass and cable bundle routing do not create local hotspots at the transceiver zone.
Pro Tip: Before swapping optics, log chassis sensor values (inlet temp, cage temp, and fan RPM) and compare them to the vendor’s recommended operating envelope. In multiple deployments, “mysterious” 800G link flaps were traced to localized airflow restriction near the module cage rather than to the optics themselves.
Best-fit scenario: Your thermal audit shows sufficient margin after accounting for planned 800G population growth, with verified airflow paths and no blocked exhaust near the switch front-to-back flow.
- Pros: 800G reduces total port count and can simplify cabling volume at the rack scale.
- Cons: Thermal headroom must be proven; otherwise, you may trade throughput for instability.

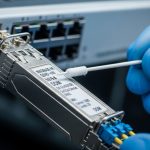
Top 4: Compatibility and standards—avoid silent mismatches
Compatibility is where 400G vs 800G decisions often turn into operational risk. Switch vendors implement transceiver support using a combination of electrical interface profiles, firmware checks, and sometimes vendor-specific optics ID policies. While IEEE 802.3 defines Ethernet physical layer behavior and link requirements, real deployments also depend on the switch’s supported module list, firmware version, and whether it expects a particular FEC mode and lane mapping.
In practice, confirm: (1) the exact transceiver form factor your switch supports (for example, QSFP-DD vs OSFP-class footprints), (2) the required DOM interface expectations, and (3) whether the platform supports the specific 400G or 800G optics type you plan to use (SR over MMF vs LR/ER over SMF). For reference on Ethernet optical PHY behavior, review [Source: IEEE 802.3]. For optics interoperability details, vendor datasheets and switch compatibility guides are decisive; start with the switch vendor’s transceiver list.
Best-fit scenario: Your planned optics are explicitly validated for your switch model and firmware, with verified DOM telemetry fields in your monitoring system.
- Pros: Using validated optics reduces unexpected link training failures and improves serviceability.
- Cons: Third-party modules may work “technically” but still fail platform ID or DOM parsing.
Top 5: Deployment economics—TCO, spares, and failure-rate realities
Cost comparisons for 400G vs 800G must include total cost of ownership: acquisition price, expected failure rates, required spares, labor time, and downtime risk. In many procurement cycles, 800G optics cost more per module, but the system can require fewer modules for the same bandwidth. The net effect depends on your port density strategy: if you are bottlenecked by optics cages and switch ports, 800G can be economically favorable; if you are bottlenecked by fiber plant constraints, the savings may be negated by re-cabling or transceiver type changes.
As a practical range, short-reach optics often land in the mid-hundreds to low-thousands USD per module depending on vendor tier and reach class; third-party and OEM-branded options can vary substantially. For TCO, include: (a) inventory holding for spares sized to your risk tolerance, (b) truck-roll and swap time, and (c) the probability that compatibility issues force a re-order.
Best-fit scenario: You are building a multi-quarter rollout where you can amortize spares and training time, and your switch vendor supports both module families with clear RMA policies.
- Pros: 800G can reduce total optics count and simplify high-density cabling plans.
- Cons: Higher per-module cost and potentially higher thermal stress can increase effective risk if not validated.
Top 6: Decision checklist engineers use before ordering
When choosing between 400G vs 800G, I recommend a structured checklist that mirrors how field teams actually reduce change risk. Use this ordered set and require sign-off from network, optics engineering, and facilities.
- Distance / reach: Confirm MMF grade (OM4 vs OM5), patch length, and expected link budget with your vendor’s stated reach conditions.
- Switch compatibility: Validate exact switch model and firmware support; check optics module ID policy and cage limits.
- DOM support: Ensure DOM telemetry fields map cleanly into your monitoring and alert thresholds.
- Operating temperature: Compare your measured inlet and cage temps to the module’s operating range; review airflow bypass risks.
- Power and cooling headroom: Estimate rack-level power draw and verify fan curve behavior under worst-case load.
- Vendor lock-in risk: Evaluate OEM vs third-party, including RMA terms, warranty length, and return logistics.
Best-fit scenario: You need a reproducible ordering gate for multiple sites, not a one-off lab success.
- Pros: Prevents last-minute incompatibility and reduces “works in test but fails in production” outcomes.
- Cons: Adds upfront validation effort, especially when introducing 800G.
Common mistakes / troubleshooting when choosing 400G vs 800G
1) Mixing MPO polarity and assuming “it will train.” Root cause: incorrect polarity or keying leads to systematic link failures that look like training instability. Solution: verify MPO polarity end-to-end with a polarity checker and document the mapping per patch panel; clean connectors before measurement.
2) Ignoring thermal hotspots at the transceiver cage. Root cause: airflow obstruction from cable bundles or blocked exhaust reduces optical module stability, causing intermittent CRC/FEC errors. Solution: measure cage temperatures under load, adjust cable routing, and confirm CRAH/CRAC airflow paths match the chassis intake geometry.
3) Relying on generic compatibility assumptions for 800G. Root cause: switch firmware expects specific electrical profiles, FEC modes, or DOM behavior; some optics pass basic insertion but fail after link re-training. Solution: check the switch vendor’s validated optics list for your exact firmware release; test in a controlled staging rack before mass install.
4) Underestimating fiber cleanliness and connector aging. Root cause: dust and micro-scratches increase insertion loss, shrinking the optical margin—more visible at higher aggregate rates. Solution: enforce an inspection workflow with an optical scope and a standardized cleaning kit; re-terminate only after ruling out patch panel contamination.
FAQ
Is 800G always better than 400G for data centers?
Not always. 800G can reduce optics count and improve throughput per rack, but it increases per-module complexity and can demand tighter thermal and compatibility validation. If your upgrade is constrained by firmware support or fiber plant margins, 400G may be the safer incremental path.
What fiber type should I plan for when moving to 800G?
Most short-reach 800G deployments use MMF around the 850 nm window, typically OM4 or OM5, but exact reach depends on the vendor’s link budget assumptions. Always validate with your planned patch lengths and connector loss measurements, not just the marketing reach number.
Do third-party optics work with 400G vs 800G?
They can, but compatibility risk is higher with 800G because platforms may enforce stricter module ID, DOM parsing, and electrical profile expectations. Use the switch vendor’s compatibility guidance and run a staging test that includes monitoring of DOM telemetry and error counters.
How do I verify DOM telemetry works after install?
After insertion, confirm that your monitoring system receives the expected DOM fields (temperature, bias, optical power, and diagnostics) and that thresholds are calibrated. If you see missing telemetry or nonsensical units, validate DOM mapping and firmware support before declaring the optics defective.
What are the most common link-flap causes at 800G?
Top causes include thermal hotspots, incorrect MPO polarity, and insufficient optical margin from dirty connectors or aged patch panels. Systematically check airflow, verify polarity, then measure optical power and error counters under load.
Which should I standardize on across multiple sites?
Standardize based on your switch firmware matrix and fiber plant verification results. If you cannot guarantee consistent airflow and patch panel cleanliness across sites, you may prefer 400G for smoother rollout while you harden processes for 800G.
Update date: 2026-05-01. If you want the fastest path from design to production, start by validating switch compatibility and fiber link budgets for both module families, then select based on thermal and TCO constraints. Next, review 400G vs 800G optics troubleshooting workflow for a field-ready testing and acceptance procedure.