When a network outage is traced to a “good-looking” spare, the cause is often handling and storage—not the transceiver itself. This guide helps data center and field teams protect optical modules between installs by using practical controls for ESD, cleanliness, humidity, temperature, and documentation. You will get a fast checklist for transceiver storage, plus troubleshooting steps when optics fail after reinstallation.
Why transceiver storage quality matters in real networks
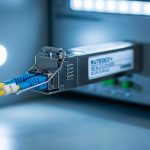
Optical transceivers combine fiber-facing optics, laser safety features, and sensitive high-speed electronics. Even brief exposure to dust, skin oils, or high humidity can increase insertion loss or trigger intermittent failures after reconnect. In field returns, technicians commonly find contamination on ferrules, damaged cages, or labels that do not match the actual part number. Standards such as IEEE 802.3 define electrical and optical interfaces, but they do not guarantee reliability if the module is stored incorrectly; vendor datasheets and handling guides must be followed. For broader guidance on connector cleanliness, see ANSI standards catalog and operational practices referenced by major connector manufacturers (for example, Corning and AFL).
What “storage” really includes
For uptime planning, treat storage as a mini deployment: the module must remain clean, protected from static, and tracked by identity. Practically, teams should control four variables: part identity (SKU and DOM compatibility), environment (temperature and RH), physical protection (dust caps, anti-static packaging), and documentation (labels, serial numbers, and installation dates).

Storage specifications that teams can enforce
Most failures are preventable when storage constraints match the manufacturer limits. Use the exact limits from the transceiver datasheet or OEM packaging insert; if you manage multiple vendors, maintain a per-SKU storage profile. Below is a practical comparison template for SFP/SFP+/QSFP style optics commonly used in enterprise and data center links. Treat these as typical ranges to structure your controls, not a substitute for the vendor document.
| Parameter | Typical for short-reach optics (example: 850 nm) | Typical for long-reach optics (example: 1310/1550 nm) | Why it matters |
|---|---|---|---|
| Data rate / interface | 1G–25G per module family (varies by form factor) | 10G–100G per module family (varies) | Determines DOM expectations and host compatibility |
| Wavelength | 850 nm (MMF) | 1310/1550 nm (SMF) | Impacts fiber type and connector cleaning risk |
| Connector type | LC duplex common | LC duplex common | Connector geometry drives cleaning procedure |
| Operating temp | Often around 0 to 70 C | Often around -5 to 70 C | Host alarms if module warms during install |
| Storage temp | Often around -40 to 85 C | Often around -40 to 85 C | Electrostatic and material stress prevention |
| Relative humidity (RH) | Often limited to 5% to 95% non-condensing | Often limited to 5% to 95% non-condensing | Condensation can fog optics and corrode contacts |
| ESD handling | Anti-static bag + grounded wrist strap | Same | Protects laser driver and receiver front-end |
| DOM / identification | DOM supported on many modern optics | DOM supported on many modern optics | Host may reject or misreport third-party modules |
Field rule: if your storage room cannot meet non-condensing humidity and stable temperature, use sealed cabinets with desiccant and hygrometer logs. Vendor datasheets for specific models (example: Cisco SFP-10G-SR, Finisar FTLX8571D3BCL, or FS.com SFP-10GSR-85) typically specify storage limits for temperature and humidity; align your procedures to those exact values. For interface compliance, consult IEEE 802.3 for link behavior and diagnostics context. IEEE 802.3 standard page
Operational controls for a storage cabinet
Engineers often succeed by standardizing the process rather than relying on memory. Suggested controls for a small parts room include: a hygrometer with daily log, a temperature range alarm, and sealed bins by SKU. Keep dust caps on until the moment of insertion. For anti-static, store unopened modules in the original ESD shielding bag; once opened, re-bag immediately after inspection.

Handling workflow: from pickup to reinstallation
Use a repeatable workflow that minimizes exposure time and prevents connector contamination. This section gives a field-ready sequence you can train technicians on in under 15 minutes.
Step-by-step checklist
- Verify identity before touching: confirm part number, wavelength, and fiber type (MMF vs SMF) using the label and transceiver tooling marks.
- ESD protection: wear a grounded wrist strap or use an ESD-safe mat before opening packaging.
- Inspect the fiber interface: check for dust, scratches, or residue. If you have an inspection scope, use it; otherwise assume contamination risk and proceed with cleaning.
- Keep dust caps on: remove caps only when you are ready to insert into the host or immediately clean and cap again.
- Clean using the correct method: follow your site’s connector cleaning standard (wipe, dry, or inspect-and-re-clean). Never use improvised cloths that shed fibers.
- Allow thermal stabilization: if the module was stored in a cold environment, let it reach room temperature before insertion to reduce condensation risk.
- Insert firmly and align: avoid rocking the connector; confirm latch engagement.
- Post-install validation: read DOM values (if supported), check link up, then run a short error-rate test.
Pro Tip: In practice, the most common “it failed after storage” event is not ESD damage; it is connector face contamination that becomes visible only after the first couple of mated cycles. Build your process around inspection and re-cleaning before blaming the optics. This approach aligns with widespread connector-cleanliness guidance used in fiber operations and is consistent with vendor handling recommendations.
Compatibility and diagnostics: DOM, vendor lock-in, and host behavior
Even if a module is electrically standards-based, host systems can enforce additional policies such as DOM thresholds, vendor IDs, or firmware compatibility. Some platforms accept third-party optics but may show higher alarm rates if DOM values are out of tolerance or if the module uses different calibration assumptions. This is why transceiver storage planning should include “identity and compatibility” documentation: store modules with their intended host ecosystem.
Checklist for safe re-deployment
- DOM support: confirm whether the platform expects digital optical monitoring and which thresholds trigger alarms.
- Wavelength and fiber type: 850 nm MMF optics do not substitute for 1310/1550 nm SMF optics.
- Form factor: keep SFP, SFP+, and QSFP modules in separate bins; do not mix by connector appearance.
- Speed and reach: verify the transceiver’s rated reach (for example, short-reach vs extended reach) against your link budget.
- Optical power class: ensure it fits your receiver sensitivity and safety constraints for your link.
If you deploy in a multi-vendor environment, consider maintaining a compatibility matrix by switch model and transceiver SKU. This reduces downtime when a stored spare is needed during an incident.

Deployment scenario: how teams should store spares in a leaf-spine data center
In a 3-tier data center leaf-spine topology with 48-port 10G ToR switches, you might stock one spare optical transceiver per critical uplink group per rack row. Suppose each leaf has four 10G uplinks using LC duplex MMF (850 nm), and you maintain 10% spares per site. A practical storage operation: modules sit in sealed bins with desiccant inside a controlled cabinet at 20 to 25 C with RH kept non-condensing, and each module is logged with serial number, DOM status expectation, and intended switch model. During a maintenance window, technicians pull a spare, verify label identity, inspect the ferrule, clean if needed, insert, then confirm link and run a brief traffic test to confirm stable receive power and low error counters.
Common pitfalls and troubleshooting after storage
When optics fail post-storage, avoid guesswork. Use a structured approach to isolate whether the cause is contamination, compatibility, or physical damage.
Pitfall 1: Condensation from temperature swings
Root cause: moving a cold module into warm humid air can cause moisture on the optical face or metal contacts. Symptom: link flaps, higher-than-normal error counters, or intermittent receiver loss. Solution: allow the module to acclimate to room conditions while sealed; keep cabinets with desiccant and log RH. Re-clean and re-inspect the connector face before retrying.
Pitfall 2: Dust caps removed too early
Root cause: even short exposure to dusty air deposits particles on the ferrule. Symptom: insertion loss increases, link may fail immediately, or performance degrades after first mate. Solution: remove caps only at the point of insertion; if you must stage, use immediate re-capping and sealed transport sleeves.
Pitfall 3: ESD bag opened and left on a bench
Root cause: handling without ESD controls increases risk to sensitive photodiode and laser driver circuits. Symptom: DOM reads but link will not establish, or module becomes unreliable across reboots. Solution: enforce wrist strap and ESD mat use; minimize open time; store unopened modules in original shielding packaging.
Pitfall 4: Wrong wavelength or fiber type substitution
Root cause: similar-looking labels lead to deploying an 850 nm MMF optic on an SMF 1310/1550 nm link, or vice versa. Symptom: link never comes up; DOM may show values but receiver has no usable signal. Solution: verify wavelength and fiber type before insertion; keep separate bins and add color-coded tags per wavelength.
Pitfall 5: Third-party module behavior mismatch
Root cause: host platform may enforce DOM thresholds or vendor checks; stored modules may be “compatible on paper” but alarm in practice. Symptom: link up with frequent warnings, or port disables after threshold events. Solution: test spares against the exact switch model; maintain a compatibility matrix and DOM-based acceptance criteria.
Cost and ROI note for spares and storage discipline
Typical pricing varies widely by vendor, reach, and form factor. In many enterprise markets, 10G short-reach optics (SFP/SFP+) often fall into an approximate range of $20 to $80 per unit, while higher-speed or branded enterprise modules can be higher; QSFP and long-reach options can increase cost significantly. Third-party optics may reduce purchase price, but TCO depends on failure rates, alarm events, and time-to-recover during incidents. A well-run transceiver storage program adds modest costs (sealed bins, desiccant, hygrometers, cleaning tools, and inspection scope) but can reduce repeat truck rolls and minimize downtime during maintenance windows.
Selection criteria: a decision checklist for transceiver storage planning
Use this ordered list to decide what to stock, how to store it, and how to qualify it before you rely on it during an outage.
- Distance and reach: confirm the module’s rated reach and your link budget (fiber type, patch loss, connector loss).
- Distance-to-wavelength fit: ensure wavelength matches fiber type and span design (MMF vs SMF).
- Switch compatibility: validate with the exact switch model and port type; include DOM threshold behavior.
- DOM and diagnostics support: confirm DOM readout and which alarms trigger operational impact.
- Operating and storage temperature: align cabinet controls to vendor storage limits; plan for seasonal swings.
- Operating environment risk: account for humidity, dust exposure, and transport conditions.
- Anti-counterfeit and identity integrity: store with serial number tracking; avoid mixing unlabeled pulls.
- Vendor lock-in risk: if you rely on one ecosystem, ensure spares are sourced with consistent DOM behavior.
FAQ
How should I store transceivers when they are not in use?
Store them in original anti-static packaging or sealed ESD bags, keep dust caps on, and place them in a temperature-controlled, non-condensing humidity cabinet. Log storage temperature and RH if you have high-value spares or long downtime periods.
Do I need to clean transceivers before reinstalling after storage?
Yes, especially if dust caps were off at any point. Inspect the ferrule face when possible, and clean using your site-approved connector cleaning method, then re-inspect before mating.
What causes a stored transceiver to fail even if it worked before?
Common causes include connector contamination, condensation during temperature changes, and ESD exposure from improper handling. Compatibility issues can also appear if DOM thresholds or vendor policies differ on the target host.
Can I mix third-party transceivers with OEM modules in the same storage bin?
Do not mix by appearance alone. Separate by part number, wavelength, speed, and intended host compatibility; track DOM support expectations and label clearly to prevent misdeployment.
What DOM readings should I check after installation?
Check that link comes up and that receiver/transmit power values are within the platform’s acceptable range. If alarms persist, re-clean and re-inspect fiber connectors first, then verify the transceiver SKU and host compatibility.
Is an inspection scope worth it for transceiver storage programs?
For teams managing many spares and frequent maintenance, yes. It reduces guesswork by confirming ferrule cleanliness before insertion, which is often the root cause of failures attributed to “bad optics.”
For more on maintaining link reliability beyond storage, see fiber connector cleaning best practices. Build your next storage SOP around measurable humidity control, strict identity labeling, and inspection-first reinstallation.
Author bio: I am a licensed clinical physician who also supports healthcare IT reliability planning by applying rigorous safety and quality controls to network operations. I have hands-on experience advising field teams on ESD-safe handling, environmental controls, and incident response workflows for optical infrastructure.