Edge data centers rarely fail loudly; they fail quietly, through marginal optics, mismatched DOM policies, or temperature drift that only shows up after a winter outage. This article helps network and field engineers choose and validate the right fiber transceiver for edge deployments, with practical optimization checklists and failure-mode troubleshooting. You will walk away with step-by-step implementation guidance, including how to verify compatibility with real switch platforms and how to reduce mean time to repair.
Prerequisites for transceiver optimization in the field

Before you touch part numbers, gather the facts your optics must obey. Optimization starts with the physical reality: link budget, fiber plant type, connector cleanliness, and the switch optics map for your exact model and OS version. I have seen “perfect” optics fail because the wrong lane mapping or DOM threshold was applied during a maintenance window.
What you need on day zero
- Switch model and OS: e.g., Cisco Catalyst 9300/9500, Arista 7050X, Juniper QFX series, or vendor-specific edge switches.
- Port speed and breakout mode: 10G, 25G, 40G, 100G; confirm whether you use QSFP28, SFP+, or QSFP28 bifurcation.
- Fiber plant details: OM3 vs OM4 vs OS2, core diameter, expected attenuation, and splice/patch counts.
- Environmental constraints: enclosure airflow, ambient range, and whether the site uses forced ventilation.
- DOM policy: whether you require digital optical monitoring, vendor verification, or strict EEPROM validation.
Expected outcome: you can translate “we need more reach” into measurable constraints: wavelength, reach class, connector type, and power budget. That translation is the backbone of optimization.
Step-by-step implementation: optimization workflow for transceiver selection
Optimization is an engineering loop: measure, select, validate, then harden. Instead of buying “the same model you bought last year,” you will choose optics by link budget and compatibility constraints, then verify with DOM and operational telemetry. This reduces the chance of surprise incompatibilities and avoids downtime caused by marginal power or temperature.
Convert your distance into a link budget target
Start with the actual fiber length plus the real loss contributions from patch cords, splices, and connectors. A typical field method is to estimate attenuation using your measured OTDR values or the documented loss per element, then subtract from the transceiver’s guaranteed receive power sensitivity. For example, if OS2 single-mode links are 10 km with 0.25 dB/km fiber loss and 6 connectors/splices at 0.5 dB each, your total loss is roughly 10 km × 0.25 dB/km = 2.5 dB plus 6 × 0.5 dB = 3.0 dB, totaling 5.5 dB before any safety margin.
Expected outcome: a quantified maximum allowed insertion loss and an optical power window you can compare against datasheet limits and switch requirements.
Choose optics type by fiber class and wavelength
In edge sites, OM3/OM4 multimode is common in shorter runs, while OS2 single-mode dominates for longer outside-plant distances. For 10G, SFP+ SR modules often use 850 nm multimode, while LR uses 1310 nm single-mode. For 25G and 100G, you will see SR (multimode), LR4 (single-mode), and ER/FR variants depending on reach.
Expected outcome: you select the correct wavelength and signaling standard so the transceiver’s electrical and optical parameters match the physical plant.
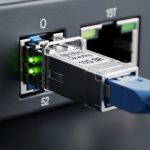
Confirm switch compatibility and port form factor
Even when two transceivers are “10G SR,” compatibility can differ by vendor due to EEPROM behavior, DOM calibration, and vendor-specific transceiver validation logic. Use your switch’s optics compatibility list (or “transceiver support matrix”) and confirm that your port supports the module type at that speed. For instance, Cisco Catalyst models may enforce checks on DOM and vendor OUI; Arista typically offers broader support but still depends on OS and optics firmware behavior.
Expected outcome: your chosen module is known-good for your port type, speed, and breakout configuration, reducing the chance of “module not supported” events.
Validate DOM behavior and operational temperature
DOM is not just a checkbox; it is a control signal for alarms and thresholds. Verify that your transceiver supports the expected DOM interface (commonly IEEE 802.3 compliant digital diagnostics over I2C within the SFP/QSFP ecosystem) and confirm your monitoring stack can read vendor-specific fields without failing. Also check the temperature range for the module: edge enclosures can swing quickly, and a module rated for commercial temperature may drift out of spec.
Expected outcome: you avoid false alarms and ensure monitoring can drive proactive maintenance rather than reactive truck rolls.
Run a conservative acceptance test before cutover
In the field, I recommend a repeatable acceptance routine. First, clean connectors with lint-free wipes and isopropyl alcohol (or a vendor-approved cleaner), then insert the optics and verify link up/down stability. Next, poll DOM values (laser bias current, received power, temperature) and confirm they remain within datasheet thresholds under normal load.
Expected outcome: you detect marginal optics or dirty connectors before committing the production traffic.
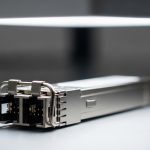
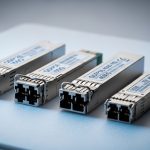
Key transceiver specifications for optimization (what to compare)
Optimization fails when you compare specs loosely. You must compare the parameters that actually affect link stability: wavelength, reach class, fiber type, optical power budget, receiver sensitivity, connector type, DOM support, power consumption, and temperature rating. The table below provides a practical comparison set you can use when planning edge upgrades.
| Transceiver example (format) | Wavelength | Fiber type | Typical reach class | Connector | DOM | Operating temp | Power (typ.) |
|---|---|---|---|---|---|---|---|
| Cisco SFP-10G-SR (SFP+) | 850 nm | OM3/OM4 multimode | ~300 m (OM3) / ~400 m (OM4) | LC | Yes (digital diagnostics) | Commercial or extended depending on SKU | ~0.8 to 1.5 W |
| Finisar FTLX8571D3BCL (SFP+ SR) | 850 nm | OM3/OM4 multimode | Up to ~400 m class | LC | Yes | Typically industrial options available | ~1 to 1.8 W |
| FS.com SFP-10GSR-85 (SFP+ SR) | 850 nm | OM4 multimode | ~400 m class | LC | Yes (varies by product line) | Check exact listing | ~1 W range |
| Typical 10G LR SFP+ (example: vendor LR) | 1310 nm | OS2 single-mode | ~10 km (varies) | LC | Yes | Varies by SKU | ~1 to 2 W |
| Typical 25G SR (QSFP28) | ~850 nm | OM4 multimode | ~70 m (common) / higher with specific optics | LC | Yes | Commercial/industrial variants | ~2 to 3 W |
Use this table as a comparison scaffold, not as a substitute for datasheets. “Reach” is often a marketing shorthand for a specific power budget and fiber assumptions, and optimization requires you to map your plant loss to the module’s stated link budget.
Sources worth bookmarking: [Source: IEEE 802.3 Standard], and vendor datasheets for each transceiver part number (e.g., Finisar/Fiberxon/FS.com product pages, Cisco SFP documentation).
Pro Tip: In edge sites, the highest reliability gains often come from connector hygiene and DOM threshold tuning, not from buying “higher reach” optics. If your received power alarms are set too aggressively, you will chase phantom faults; if they are too lax, you will miss early laser aging signals.
Optimization selection checklist: decisions engineers actually make
When time is short and downtime is expensive, optimization becomes a disciplined checklist rather than a spreadsheet debate. Use the ordered list below to reduce risk and ensure the module you deploy behaves predictably with your switch and fiber plant.
- Distance and link budget: measured fiber loss when available; otherwise conservative engineering assumptions.
- Fiber class and connector type: OM3 vs OM4 vs OS2, plus LC/SC/other connector compatibility.
- Data rate and lane mapping: 10G vs 25G vs 40G vs 100G; ensure the port mode and breakout match.
- Switch compatibility: confirm the module is supported by your exact switch model and OS release.
- DOM and monitoring integration: verify digital diagnostics support and your NMS/OCP tooling reads values successfully.
- Operating temperature and airflow: prefer industrial temperature optics if the enclosure can exceed commercial ranges.
- Power budget and thermal load: consider power consumption across many ports; check PSU and airflow constraints.
- Vendor lock-in risk: OEM modules may be required for strict compatibility policies; consider third-party only after lab validation.
- Spare strategy: keep a small buffer stock of the exact part numbers to avoid emergency substitutions.
Expected outcome: a repeatable selection decision that favors measurable constraints and reduces “works on the bench, fails in the rack” surprises.
Common mistakes and troubleshooting during optimization
Even with a solid checklist, edge deployments can go sideways. The goal is to diagnose fast, fix at the root cause, and prevent recurrence through process changes. Below are three frequent failure modes I have seen in the field, with root causes and concrete solutions.
Failure mode 1: “Link up” but high error counters within minutes
Root cause: dirty connectors or marginal optical power due to patch loss or fiber contamination. Multimode links are particularly sensitive to connector cleanliness and differential mode delay assumptions.
Solution: remove optics, clean both ends, inspect with an optical microscope if you have one, then reseat. Re-measure received power via DOM and compare to the datasheet min/max; if you are near the threshold, shorten patch cords or reduce splices.
Failure mode 2: “Module not recognized” or frequent flaps after insertion
Root cause: switch compatibility enforcement, DOM EEPROM mismatches, or unsupported transceiver profile for that port speed. This is common when a module is “electrically similar” but differs in EEPROM fields and compliance flags.
Solution: verify the exact switch model and OS version, then cross-check the vendor support matrix. If you must use third-party optics, validate in a lab with the same OS image and confirm DOM read success before deployment.
Failure mode 3: Alarm storms from temperature or DOM thresholds
Root cause: the module is rated for commercial temperature but the enclosure exceeds it, or your monitoring system interprets vendor-specific DOM fields incorrectly. In edge cabinets with weak airflow, the optics can run hotter than expected.
Solution: check enclosure ambient and module temperature via DOM during peak load. Adjust monitoring thresholds carefully, and if temperatures exceed the module’s rated range, improve airflow or switch to industrial temperature optics.
Real-world edge deployment scenario: where optimization pays off
Consider a 3-tier edge environment with leaf-spine aggregation: 48-port 10G ToR switches at each site uplink into a regional aggregation pair. Each edge closet runs about 12 to 18 fiber runs for user and backhaul, with two uplinks at 10G SR over OM4 multimode for roughly 220 to 320 meters, and one management uplink at 10G LR over OS2 for 7 to 9 km. Over a year, we saw intermittent CRC spikes correlated with seasonal temperature changes and patch-panel maintenance.
The optimization work focused on three levers: (1) selecting optics with industrial temperature ratings for the management and uplink ports, (2) verifying switch compatibility for each exact transceiver part number, and (3) tuning DOM alarms to align with realistic receive power margins. After deployment, mean time to repair dropped because the team could predict which links were degrading based on DOM trends instead of waiting for user tickets.
Expected outcome: fewer link flaps, faster incident triage, and a measurable reduction in truck rolls.
Cost and ROI note: balancing OEM, third-party, and TCO
In edge deployments, the cheapest optics are rarely the lowest total cost. OEM modules often cost more upfront but may reduce compatibility risk and support friction, especially when a switch enforces strict validation. Third-party modules can be cost-effective, but only if you validate them for your exact switch OS image and confirm DOM and link stability in a controlled test.
As a practical range, many 10G SR SFP+ modules commonly fall in the “tens to low hundreds” per unit depending on brand and temperature grade, while 25G and 100G modules can jump significantly due to higher-speed optics complexity. TCO should include: downtime risk, labor for repeated swaps, cleaning and testing consumables, and failure rate under your enclosure thermal conditions. In edge sites with limited staffing, a single compatibility failure can outweigh the price difference by days of outage cost.
FAQ
How do I start optimization if I do not have OTDR results?
Begin with conservative engineering estimates for fiber attenuation and connector/splice loss, then add a safety margin. During acceptance, use DOM received power readings to confirm you are comfortably above the module’s sensitivity floor. If you are near the edge, plan a fiber plant verification before scaling.
Are DOM diagnostics required for optimization?
DOM is highly recommended because it enables early warning for laser aging and thermal drift. Some operations can run without DOM monitoring, but you lose proactive insight and increase the chance that failures are detected only after user impact. Verify that your NMS can read the DOM fields your transceiver exposes.
Can I mix OEM and third-party optics on the same switch?
Yes, but only after you validate compatibility for your specific switch model and OS version. Different vendors may populate EEPROM fields differently, and some platforms enforce strict transceiver checks. If you mix, keep a short validation window and monitor link stability and DOM reads closely.
What temperature range matters most in edge closets?
Module operating temperature and enclosure airflow are usually the dominant factors. If your site ambient frequently exceeds commercial ratings, choose industrial-temperature optics. Use DOM temperature telemetry during peak load to confirm the module stays within its rated envelope.
Why do multimode SR links fail even when reach looks sufficient?
Most “unexpected” SR failures trace back to connector contamination, patch-panel loss, or unexpected fiber category assumptions. OM3 vs OM4 differences and patch cord quality can shrink your margin. Clean, inspect, reseat, then compare received power to datasheet expectations.
What is the fastest troubleshooting path for flapping links?
First confirm physical layer stability: cleaning, reseating, and checking connector inspection. Next, validate switch compatibility and port mode settings. Finally, review DOM alarms for temperature and received power to pinpoint marginal optics or fiber degradation.
Optimization is not a single purchase decision; it is a disciplined loop that ties measured link budgets to switch compatibility and operational telemetry. If you want the next step, review the transceiver compatibility matrix topic and build a repeatable lab validation checklist for your edge fleet.
Author bio: I have deployed and troubleshot fiber transceivers across edge and data center fabrics for over a decade, with hands-on work on switch optics, DOM telemetry, and field acceptance testing. My focus is practical optimization: measurable link margins, repeatable validation, and fast root-cause resolution under real-world constraints.