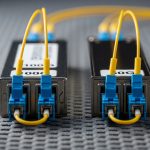
If you run industrial Ethernet in plants, ports, or utilities, the wrong optical link budget or a mismatched SFP can turn a stable network into intermittent faults. This article helps field engineers and automation integrators choose and deploy the Moxa SFP transceiver correctly with Moxa industrial switches by covering prerequisites, step-by-step installation, and validation. You will also get a specs comparison table, common failure modes with root causes, and a practical selection checklist aligned to real commissioning workflows.
Prerequisites: what you must verify before touching the SFP
Before inserting a module, confirm that your Moxa switch model supports the exact transceiver form factor and optical class, and that your fiber plant matches the wavelength and connector type. Industrial environments add constraints: vibration, temperature swings, and sometimes dust or condensation, so module thermal limits and link diagnostics matter as much as raw reach. For standards context, Ethernet optical interfaces follow the electrical and optical layer behaviors defined by IEEE 802.3 (e.g., 1000BASE-X for Gigabit over fiber) and vendor implementations typically map to SFP MSA expectations.
Prerequisite checklist (hardware and documentation)
- Identify the switch model and confirm the approved SFP part numbers in the Moxa datasheet or user manual (model-specific support is common).
- Determine the required data rate (commonly 1G for SFP in many Moxa deployments; some platforms support higher rates depending on module family).
- Match wavelength and fiber type: typical selections include 850 nm (multimode) and 1310 nm (single-mode), but the exact option depends on the switch and optics.
- Confirm connector and fiber termination: LC vs SC, APC vs UPC, and whether patch cords match the plant loss budget.
- Record environmental constraints: operating temperature range, exposure to vibration, and whether you use surge protection or grounding blocks.
Expected outcome: you have the correct module SKU, the correct fiber path details, and a commissioning plan that avoids trial-and-error in live cabinets.

Step-by-step implementation: install and validate the Moxa SFP transceiver
Once prerequisites are confirmed, treat the installation as a controlled change. The goal is not only to bring the link up, but to ensure stable operation under temperature cycling and to verify that the optical budget and diagnostics match expectations.
Power and ESD handling
Follow your site safety policy. In many deployments you can insert an SFP while the system is powered and the switch supports hot-plug, but you should still minimize contact with connector pins and avoid pulling fiber under tension. Use proper ESD precautions, especially in dry environments where static discharge risk increases.
Expected outcome: the module is inserted without mechanical stress to the cage and without electrical contact issues.
Clean and connect fiber correctly
Optical failures after installation are frequently contamination-related. Clean fiber end faces with lint-free wipes and approved cleaning tools before mating, and confirm that you use the correct polarity and connector type. For LC connectors, ensure the latching orientation is consistent and that the patch cord is fully seated.
Expected outcome: the fiber connection is physically correct and contamination risk is minimized.
Verify link state and optical diagnostics
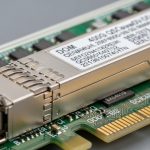
After insertion, check link status from the switch management interface (web UI, CLI, or SNMP depending on your model). Look for link up/down events, negotiated speed, and any optical warnings such as receive power out of range. Many Moxa platforms expose diagnostics like RX/TX power and sometimes DOM availability depending on module support.
Expected outcome: the link transitions to stable forwarding without flapping.
Validate throughput and error counters
Run a controlled traffic test from a host connected through the switch, such as iPerf or your standard OT traffic generator. Then inspect interface counters for CRC errors, FCS errors, and input drops. In industrial links, you want a baseline of “near-zero errors” during normal operation and you should re-check after any temperature or cabinet airflow changes.
Expected outcome: the link is stable under real traffic with error counters consistent with a healthy optical budget.
Document configuration and physical plant mapping
Record the SFP part number, serial number if available, fiber patch cord IDs, and the port mapping (e.g., switch port to remote device). This matters during incident response: when a link fails months later, you will need to quickly determine whether the issue is a fiber path change, a module aging event, or a transceiver mismatch.
Expected outcome: fast rollback and root-cause analysis capability.
Pro Tip: In field commissioning, teams often focus on “link up,” but the more reliable acceptance test is checking receive power (RX) against the module and the switch thresholds. A link that appears stable at room temperature can degrade under thermal stress if the RX level is near the lower sensitivity limit, causing intermittent CRC errors later.
Moxa SFP transceiver selection: specs that actually decide link success
Industrial Ethernet links live or die by the optical budget: wavelength, reach, and the real measured attenuation of your fiber path. Below is a practical comparison of common 1G SFP optical options you will encounter when selecting a Moxa SFP transceiver for Moxa industrial switches. Always verify that your specific Moxa switch supports the exact module family and that DOM reporting is compatible with your monitoring workflow.
Technical specifications comparison table
| Spec | Typical 1000BASE-SX (850 nm) | Typical 1000BASE-LX (1310 nm) | Typical 1000BASE-LH (1550 nm) |
|---|---|---|---|
| Nominal wavelength | 850 nm | 1310 nm | 1550 nm |
| Target fiber type | Multimode (MMF) | Single-mode (SMF) | Single-mode (SMF) |
| Typical reach class | Up to 550 m (MMF, depends on OM grade) | Up to 10 km (SMF) | Up to 40 km (SMF, depends on module) |
| Optical budget sensitivity (vendor dependent) | Often designed around short-distance MMF budgets | Designed for SMF attenuation and margins | Optimized for long-haul SMF losses |
| Connector | Commonly LC | Commonly LC | Commonly LC |
| DOM / monitoring | Varies by vendor and switch support | Often available (DOM) | Often available (DOM) |
| Operating temperature | Often industrial variants: -40 C to +85 C (verify per SKU) | Often industrial variants: -40 C to +85 C (verify per SKU) | Often industrial variants: -40 C to +85 C (verify per SKU) |
| Standards alignment | IEEE 802.3 1000BASE-SX behavior | IEEE 802.3 1000BASE-LX behavior | IEEE 802.3 1000BASE-LH behavior |
Note: exact reach, TX power, and RX sensitivity differ by module manufacturer and class. Always use the vendor datasheet for the specific part number you plan to install.
Expected outcome: you narrow module choices to the optical class that matches fiber type and the path loss budget.

Real-world deployment scenario: Moxa fiber uplinks in a leaf-spine-like OT fabric
Consider a manufacturing plant with a two-layer architecture: access switches at machine cells and a fiber uplink layer aggregating to a control-room switch. In one common scenario, you have 12 machine cells, each with a Moxa industrial Ethernet switch providing 8 copper access ports plus a fiber uplink. The fiber uplinks are 1G and run over 2 to 6 km of single-mode plant fiber with patch panels and two inline splice trays. Engineers often choose an 1310 nm single-mode SFP class for the uplinks, then validate receive power at commissioning to ensure margins after seasonal temperature swings.
During acceptance testing, the team generates traffic at a steady rate (for example, 600 Mbps average per uplink during a maintenance window) and monitors CRC errors and interface drops. If any uplink shows rising errors only during hot afternoons, the root cause is frequently an RX level margin issue caused by connector contamination, higher-than-modeled splice loss, or a patch cord that was swapped during maintenance. This is why the RX diagnostic check and link stability verification step are part of the standard operating procedure.
Expected outcome: predictable uplink stability with measurable error counters and documented optics choices.
Decision checklist: how engineers choose the right Moxa SFP transceiver
Engineers usually do not “pick a transceiver by reach alone.” They compare operational constraints, compatibility risk, and monitoring requirements. Use the ordered checklist below to make the selection repeatable across sites and vendors.
- Distance and path loss budget: use measured fiber test results (OTDR or fiber cert) when available; include connector and splice loss.
- Data rate and Ethernet clause behavior: confirm the switch port supports the intended Ethernet over fiber mode; align with IEEE 802.3 expectations.
- Fiber type and wavelength: choose SX for multimode, LX/LH for single-mode; ensure wavelength matches the plant fiber and the partner device.
- Connector type and polarity: confirm LC/SC and correct transmit/receive mapping; validate patch cord IDs.
- Switch compatibility and approved part numbers: verify Moxa support lists for your switch model; avoid “works on one switch” assumptions.
- DOM support and monitoring: check whether your switch reads DOM and whether your NMS expects specific DOM fields.
- Operating temperature and thermal margin: pick industrial-grade modules with a temperature range aligned to your cabinet and ambient extremes.
- Vendor lock-in risk: consider whether third-party modules will be accepted by the switch and whether support contracts require OEM optics.
- Spare strategy: stock a matching spare and label it with SKU and wavelength class; confirm the spare is from the same optical family.
Expected outcome: a selection that satisfies both link physics and operational governance (supportability, monitoring, and maintainability).

Common mistakes and troubleshooting: top failure modes in the field
Even with correct parts, industrial optical links fail due to installation practices, power issues, or plant fiber anomalies. The troubleshooting below focuses on fast identification and the most common root causes.
Troubleshooting failure point 1: Link never comes up
Root cause: fiber polarity reversed, wrong wavelength class, or connector not fully seated. Contamination can also prevent optical coupling, especially with LC connectors.
Solution: verify wavelength (850 vs 1310 vs 1550 nm) on both ends, confirm connector type and polarity, reseat the connectors, and clean both fiber end faces again using an approved cleaning workflow. If possible, test with a known-good fiber patch cord.
Troubleshooting failure point 2: Link flaps or CRC/FCS errors increase
Root cause: marginal RX power due to higher-than-modeled splice loss, damaged patch cord, or temperature-induced optical power drift near sensitivity limits. Vibration can worsen micro-misalignment if the patch panel is mechanically stressed.
Solution: check interface error counters and any optical diagnostics (RX/TX power, LOS alarms). Replace suspected patch cords first, then inspect splice trays and patch panel strain relief. If you have fiber certification results, compare actual loss to the module’s budget and re-terminate if needed.
Troubleshooting failure point 3: Monitoring shows DOM errors or missing values
Root cause: DOM format mismatch, unsupported DOM fields, or a third-party module that is electrically compatible but not fully aligned with the switch’s DOM parsing expectations.
Solution: confirm DOM compatibility in the Moxa switch documentation and vendor datasheets. If DOM data is critical for your monitoring, prefer modules explicitly validated for your platform. Consider using OEM optics for the first deployment wave, then evaluate third-party modules in a pilot area.
Cost and ROI note: OEM vs third-party SFP optics in OT environments
In practice, OEM optics for industrial switches can cost materially more per module than third-party equivalents. Typical street pricing varies by wavelength and reach, but engineers often see OEM modules priced significantly above commodity SFPs, while third-party modules may be discounted yet still function. The ROI question is not only purchase price: consider failure rates, RMA turnaround, and commissioning time. A single multi-hour outage during a plant shift can outweigh the savings from cheaper optics, especially if troubleshooting depends on DOM visibility.
TCO considerations: include labor for installation and fiber cleaning, the cost of spares held in inventory, and the operational cost of monitoring gaps when DOM support is incomplete. If your site has strict compliance requirements, OEM optics can reduce risk during audits and support escalations.
FAQ
Which Moxa industrial switch models require specific SFP transceiver part numbers?
Many Moxa platforms maintain model-specific compatibility lists. Check your switch user manual or Moxa support documentation for the exact module families and part numbers approved for your port type. If you deploy third-party optics, validate in a pilot rack before wide rollout.
Can I use a non-Moxa SFP transceiver if it is the same wavelength and reach?
Sometimes yes at the physical layer, but it can fail at the management layer (DOM parsing) or due to subtle electrical parameter differences. If DOM monitoring is part of your acceptance criteria, verify that the switch reads DOM fields correctly. For critical links, OEM optics often reduce operational risk.
How do I confirm the optical budget before commissioning?
Use measured fiber loss data from fiber certification tools when available, then compare against the module’s documented TX power and RX sensitivity requirements. During commissioning, use switch diagnostics to confirm RX power is within expected range and that error counters remain stable under traffic. This provides real-world margin validation beyond theoretical reach.
What fiber cleaning method prevents most optical link issues?
Use an approved end-face cleaning workflow with appropriate wipes and cleaning tools, then re-clean if you suspect contamination. Always clean before first mating and after any connector handling. Keep dust caps on connectors until the moment of insertion.
What is DOM, and why does it matter for industrial monitoring?
DOM (Digital Optical Monitoring) provides readings like temperature and optical power. In OT environments, DOM helps detect degradation before total link failure, enabling proactive maintenance. If your switch does not support DOM for a module, you may lose early warning signals.
Where should I look first if the link comes up but traffic drops?
Inspect interface error counters (CRC/FCS) and drop counters to determine whether the issue is physical-layer errors or higher-layer congestion. Then confirm that both ends negotiate the same speed/duplex expectations and that VLAN or QoS policies are consistent with your design. If errors spike only under certain conditions, correlate with cabinet temperature and airflow changes.
Sources: [Source: IEEE 802.3] [Source: SFP Multi-Source Agreement (SFP MSA) documentation] [Source: Moxa industrial switch user manuals and transceiver compatibility notes] [Source: Vendor datasheets for 1000BASE-SX/LX/LH SFP modules such as Finisar/FS/SFP OEM sheets].
Next step: if you are mapping your plant fibers and planning replacements, review fiber-optic-link-budget-and-cleaning-checklist to standardize acceptance testing and reduce repeat failures.
Author bio: I am a hands-on network commissioning engineer who routinely validates optics with measured loss budgets, RX power thresholds, and error-counter baselines on industrial Ethernet links. I write from field experience to help teams avoid compatibility traps and shorten outage recovery time.