In a busy data center, a single flaky fiber link can trigger link flaps, CRC storms, and sudden throughput drops that look like “software issues.” This article helps network and field engineers perform optical troubleshooting systematically, from transceiver DOM checks to fiber re-termination, using practical thresholds and real vendor models. You will learn how to interpret link symptoms, validate optical budgets, and avoid the most common failure modes that waste hours.
Start with link symptoms: map errors to optics vs fiber
Before you touch a patch panel, treat the incident like a diagnosis: symptoms tell you which layer is likely at fault. A reliable pattern is that physical-layer problems (optics, fiber, connector contamination) often show as link up/down events, high FEC correction counts (where applicable), or steady CRC errors that correlate with temperature and motion. In contrast, routing or VLAN issues rarely change optical power or error counters in a tight physical cadence.
What to collect from switches (fast, high-signal checks)
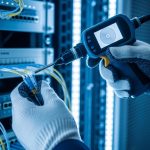
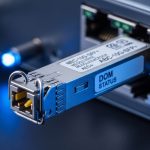
On your top-of-rack or leaf switches, capture the counters and optics telemetry around the time the issue started. If your platform supports it, record: received optical power (Rx), transmitted power (Tx), laser bias current, module temperature, and any alarm flags. Also capture interface error counters such as CRC, FCS, symbol errors, and any “link training” or “loss of signal” indicators. If you are using pluggables, check whether the module reports vendor-specific diagnostics via DOM.
Interpretation cues that narrow the search
- Link flaps + “loss of signal” or “Rx power too low”: likely fiber break, bad connector, wrong polarity, or degraded patch path.
- Link stays up but CRC spikes + FEC correction rises: often marginal optical budget, dirty connectors, or slight misalignment in active optics.
- Errors correlate with airflow/temperature: suspect aging optics, marginal laser bias, or thermal stress on the module cage.
- Only one direction fails: check polarity and Tx/Rx mapping, especially with LC duplex and MPO breakout harnesses.

Optical troubleshooting workflow: isolate, measure, and confirm
Think of optical troubleshooting as “three measurements and one reset.” First, measure the optical path quality. Second, measure the transceiver health via DOM. Third, confirm the link partner behavior. Finally, do a controlled change (clean, reseat, swap) to prove causality rather than guessing.
Verify transceiver identity and DOM health
Start with the module you are currently using and its peer. For common 10G/25G/40G/100G optics, you can usually read DOM values like Rx power (dBm), Tx power, laser bias current (mA), and module temperature (C). If Rx is near the lower sensitivity threshold or the module reports high internal temperature, you have a strong physical-layer lead. If DOM shows “Tx disabled” or “low laser bias,” reseat the module and inspect the cage for dust or bent pins.
Validate the optical budget against wavelength and reach
Optical budget is not a marketing slogan; it is a calculation that includes transmitter power, receiver sensitivity, and worst-case losses from fiber attenuation, connectors, splices, and patch cords. For example, an SR multimode link uses 850 nm optics and typically relies on OM4 or OM5 fiber. If you mixed OM3 and OM4, the effective bandwidth and modal behavior can degrade, raising error rates even when the link “seems up.” Always compare the deployed fiber type and length to the optics’ specified reach for the data rate.
Perform loopback tests and swap components
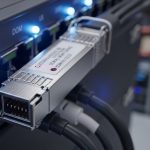
When you suspect a marginal link, isolate variables. Swap the transceiver on the same port, then swap the patch cord, then swap the far-end transceiver. If errors move with the transceiver, the module is likely defective or out of spec. If errors stay with the fiber path, move to connector cleaning and re-termination.
Pro Tip: In the field, the fastest confirmation of a “dirty connector” versus a “bad fiber” is to clean only one connector end, then measure Rx power immediately. If Rx power improves by a noticeable amount and CRC/FEC counters drop without changing anything else, contamination was the root cause. If nothing changes, shift to polarity, fiber integrity, or an incorrect fiber type.
Key optics specs that drive troubleshooting decisions
Engineers often troubleshoot by intuition (“it should reach”), but optical troubleshooting is easier when you know which specs matter most for the failure mode you are seeing. Wavelength determines which fiber type is compatible; reach limits your allowable link loss; connector type affects contamination risk; and temperature range affects power stability.
Comparison table: common data center transceivers
The table below uses representative modules and typical specifications found in vendor datasheets for mainstream data center deployments. Always confirm exact limits on the specific part number you own.
| Module (example part) | Data rate | Wavelength | Typical reach | Connector | Rx power / sensitivity notes | Operating temperature |
|---|---|---|---|---|---|---|
| Cisco SFP-10G-SR | 10G | 850 nm | ~300 m on OM3 (typical) | LC duplex | Check DOM Rx power in dBm; marginal links show low Rx near sensitivity | 0 to 70 C (varies by exact spec) |
| Finisar FTLX8571D3BCL | 10G | 850 nm | ~300 m on OM3 / higher on OM4 (typical) | LC duplex | DOM alarms can indicate low laser bias or high temperature | 0 to 70 C (typical) |
| FS.com SFP-10GSR-85 | 10G | 850 nm | ~400 m on OM4 (typical) | LC duplex | Verify you did not exceed link loss with extra patch cords | 0 to 70 C (typical) |
| QSFP28 SR4 (example class) | 100G | 850 nm | ~100 m on OM4 typical | MPO/MTP (typically) | Multi-fiber effects: one bad lane can increase FEC/CRC | 0 to 70 C (typical) |
What to do with these specs during troubleshooting
If you see “low Rx power,” compare Rx dBm to the module’s sensitivity window and your documented link budget. If the module is 850 nm SR but the installed fiber is not the expected multimode grade, you may see errors without obvious link drops. If you are using MPO/MTP breakout trunks for 40G/100G, remember that a single dirty or damaged lane can cause disproportionate errors even when overall received power looks acceptable.

Selection criteria for the next module or patch change
Optical troubleshooting often ends with a replacement decision: a module, a patch cord, or a fiber harness. To avoid repeating the same failure mode, use a checklist that matches your network’s constraints and your operational reality.
- Distance and allowable link loss: confirm installed fiber length in meters and count connectors/splices from the actual route, not the floorplan.
- Correct fiber type and grade: for 850 nm SR, ensure you have OM3/OM4/OM5 as designed; do not assume “multimode is multimode.”
- Switch and port compatibility: verify transceiver type support on the host (SFP, SFP+, QSFP+, QSFP28) and any vendor-specific compatibility lists.
- DOM and alert behavior: choose modules that expose Tx/Rx power, temperature, and laser bias so future optical troubleshooting is faster.
- Operating temperature and thermal fit: check the specified temperature range and whether the module seats fully in the cage without airflow obstruction.
- Vendor lock-in risk: if you must use OEM-only optics, factor higher unit cost and replacement lead times into TCO.
- Connector strategy: LC duplex for 10G is easier to inspect; MPO/MTP for higher speeds requires disciplined lane cleaning and polarity control.
- Validation plan: predefine what counters and Rx thresholds must look like after installation to confirm success.
When you should test before you replace
If you have intermittent errors, do not swap blindly. Perform a controlled clean and reseat first, then compare DOM values and error counters. If you can, test the same transceiver in a known-good port. This saves time because replacements can be expensive and may introduce compatibility or programmatic differences.
Common mistakes and troubleshooting tips that prevent repeat failures
Even skilled teams lose time when they skip the highest-signal steps. Below are frequent failure modes in data center optical links, with root causes and practical solutions.
Wrong polarity or swapped Tx/Rx mapping
Root cause: Duplex LC connectors are sometimes patched with reversed polarity, especially after panel rework. For MPO/MTP, lane polarity mismatches are common when using breakout harnesses.
Solution: Confirm polarity mapping end-to-end. Use polarity testers or consistent patching rules, then re-measure link presence and Rx power after correction.
Dirty connector endfaces and invisible contamination
Root cause: Dust and micro-scratches on connector endfaces reduce coupling efficiency. The link may come up but show rising CRC or FEC correction under load.
Solution: Inspect with a microscope, clean using lint-free wipes and approved cleaning tools, and re-test immediately. If you see persistent degradation, replace patch cords rather than repeatedly cleaning the same damaged end.
Exceeding optical budget with “extra” patch cords
Root cause: Engineers account for planned lengths, but the real path includes additional patch cords, cross-connect jumpers, and temporary reroutes. Multimode links are especially sensitive to connector density and patch cord count.
Solution: Rebuild the actual link loss from the route: transmitter power (from DOM if available), fiber attenuation, connector loss per interface, and splice loss. Reduce patch cord count or replace with lower-loss assemblies if budget is exceeded.
Assuming all multimode fiber behaves the same
Root cause: OM3 vs OM4 vs OM5 differences in modal bandwidth can cause marginal performance that only appears at higher data rates or after equipment swaps.
Solution: Verify fiber grade labeling or test with appropriate fiber characterization tools. Align optics selection to the installed fiber grade and documented standards.
Thermal or mechanical stress on pluggables
Root cause: Partially seated optics or airflow obstruction can increase module temperature, shifting laser bias and raising error rates.
Solution: Reseat modules with the correct torque and alignment, confirm the cage latches fully, and ensure airflow paths are not blocked. Monitor DOM temperature during peak load.

Cost and ROI: what optical troubleshooting saves (and what it costs)
Replacement optics and patch components vary widely by speed and brand, but realistic planning helps. In many data centers, OEM 10G SR SFP modules can cost materially more than third-party equivalents, while QSFP28/100G SR modules can be several times that due to higher density and tighter tolerances. From a TCO perspective, the biggest cost is often outage time: an optical incident that causes a brief packet loss window can trigger autoscaling events, job retries, and operational escalations.
A disciplined optical troubleshooting workflow reduces mean time to repair by avoiding trial-and-error swaps. However, be honest about limitations: third-party optics may not match OEM DOM alarm thresholds, and some vendors implement stricter host compatibility checks. Budget for cleaning tools and microscopes too; they are small compared to the cost of re-termination work, truck rolls, and production impact.
FAQ
What should I check first during optical troubleshooting?
Start with switch interface counters and optics telemetry: Rx power, Tx power, module temperature, and any loss-of-signal alarms. Then confirm whether the link is flapping or staying up with CRC/FEC errors. This quickly tells you whether to focus on fiber integrity, connector contamination, or module health.
How do I know if the issue is the fiber or the transceiver?
Use a swap strategy: move the same transceiver to a known-good port, and then move a known-good transceiver to the suspect port. If the problem follows the transceiver, replace the module. If it stays with the port and patch path, inspect connectors and validate the fiber route.
Is a link-up status enough to ignore optical errors?
No. A link can be up while the physical layer is operating near sensitivity limits, causing CRC spikes or rising FEC correction. In optical troubleshooting, always correlate DOM Rx power trends with error counters under traffic load.
What cleaning and inspection method works best for LC and MPO connectors?
Inspect endfaces with a microscope before cleaning, then clean with approved tools and lint-free materials. For MPO/MTP, clean and inspect both the trunk and the breakout connector ends, and follow lane polarity rules. Re-test immediately so you can confirm improvement rather than guessing.
Do I need to follow IEEE standards when selecting optics?
Yes, standards guide the expected electrical and optical behavior, including reach and modulation assumptions. For Ethernet physical layers, reference IEEE 802.3 for the relevant PHY type and expected performance. Also confirm module datasheets and host switch requirements for DOM and compatibility.
Where can I find authoritative reach and diagnostic details?
Use the specific optics datasheet for Rx power ranges, sensitivity, and DOM diagnostic fields. For host compatibility, consult the switch vendor’s transceiver support matrix. For general physical layer expectations, see IEEE 802.3 documentation and reputable vendor application notes. IEEE Standards
For your next incident, start by capturing DOM and error counters, then isolate fiber versus optics using controlled swaps and connector inspection. If you want a complementary workflow, see related topic for operational playbooks that pair physical-layer checks with packet-level validation.
Author bio: A field-focused network engineer who has deployed and repaired multi-speed Ethernet optics in data centers with measurable link-loss budgets and repeatable test procedures. I write troubleshooting guidance that matches how on-call teams work under time pressure and change-control constraints.
Sources: [Source: IEEE 802.3] [Source: Cisco transceiver documentation for SFP/SFP+ diagnostics and compatibility] [Source: Finisar and FS.com optic datasheets for Rx/Tx and operating temperature ranges]